Installing priint:suite on Linux
1 Introduction
This manual describes how to install and update Publishing Server on Linux machine. Installation process consists of 4 stages:
- Downloading DEBIAN package into a server
- Deploying the package
- Configuring settings in
settings.install.xmlfile - Running installer
The document assumes that the user posses basic knowledge of Linux administration.
2 Prerequisites
The migration is required for all versions lower than 4.1.7.3459.
Important! From MySql 5.7 version default user authentication method has changed. Database Engine installation is required before installer is started.
Storage (MinIO) service: MinIO service on Linux must be installed and running. Please refer to the page how to install and configure it.
3 Installation
3.1 System prerequisites
Publishing Server for Linux was initially designed for Debian/GNU family especially for Ubuntu distribution of Linux. It supports Ubuntu Server 20.04 LTS and higher. This distribution is supported and recommended. The process of installation assumes that Ubuntu Server and Database Engine are installed.
Hint! In case of the comet pdf renderer as rendering server, you need to install this manually according to https://kb.priint.com/index.php/article/comet-pdf-renderer-download-and-installation/
3.2 Package download
The package of Publishing Server Installer is a .deb file (the format, as well as extension of the software package format for the Linux distribution Debian and its derivatives including Ubuntu).
It is named like PubServer_Base_<version number>.<build number>_UbuntuLinux_<Ubuntu-Version>.deb.
First thing, we need to download the package to Linux system. How to do this depends on the system and network configuration and should be done by administrator. In next points, some methods are presented.
3.2.1 Download from HTTP or FTP Server (by wget)
If the package file is located on WWW or FTP Server, it can be downloaded by wget command:
wget http://<ip>:<port>/PubServer_Base_<version number>.<buildnumber>_UbuntuLinux_18.04.1.deb
3.2.2 Pushing by (p)sftp
Ubuntu Server has run OpenSSH Server, so we can use sftp (Secure File Transfer Protocol) to transfer file into a server. In the example below, psftp is used (it is a part of PuTTy software – a free ssh client for Windows, available on https://www.putty.org/)
>psftp 192.168.56.101
login as: priintadmin
_priintadmin@_192.168.56.101's password:
Remote working directory is /home/priintadmin
psftp>
put PubServer_Base_<version number>.<build number>_UbuntuLinux_18.04.1.deb
local:install => remote:/home/priintadmin/install
psftp>
3.3 Package deployment
When the package is downloaded, we can deploy it. To do this, we should run a command:
sudo dpkg -i PubServer_Base_<version number>.<build number>_UbuntuLinux_18.04.1.deb
In the directory opt the folder pubserver should be created.
3.4 Preinstallation settings
Before we continue, we need to check/change settings from file
/opt/pubserver/etc/settings.install.xml
according to our needs.
3.4.1 MinIO Settings (NEW)
In order to configure object storage (MinIO) new entries must be added/set in settings.install.xml before installation.
<entry key="MinIOEndPoint">http://127.0.0.1:9000</entry>
<entry key="MinIOAccessKey">minioadmin</entry>
<entry key="MinIOSecretKey">minioadmin</entry>
The following key is optional. It allows to map the default storage bucket name (tenant-project) to different name required by the customer.
<entry key="RealBucketName">OPTIONAL_REAL_BUCKET_NAME</entry>
| key | description | example value |
|---|---|---|
| MinIOEndPoint | MinIO endpoint | http://127.0.0.1:9000 |
| MinIOAccessKey | acccess key (username) | minioadmin |
| MinIOSecretKey | secret key (password) | minioadmin |
| RealBucketName | It allows to map the default storage bucket name (tenant-project) to different name required by the customer | OPTIONAL_REAL_BUCKET_NAME |
3.4.2 Other Settings
Installation options in the file settings.install.xml are described here.
The setting JVM_XMX controls the memory size of the Java VM. The default setting is good for a developer pubserver. For an acceptance or production pubserver, usually a higher value is recommended. The format of the value follows the Java convention.
If a remote renderer (InDesign Server with comet or comet pdf renderer) shall be used, the following settings should be adjusted.
| key | description | example value |
|---|---|---|
| GlassfishHttpServer | Address of the pubserver machine | 172.27.15.17 or pubserver.kontoso.com |
| InDesignServer | Either on, use an InDesign Server or off, do not use an InDesign Server | on |
| InDesignServerHost | Address of the rendering server for InDesign Server | 172.27.15.18 or renderer.kontoso.com |
| InDesignServerPort | First port of the InDesign Server instances, the others will be incremented automatically | 4711 |
| InDesignServerInstancesJob | Number of InDesign Server instances reserved for Server Jobs | 3 |
| InDesignServerInstancesMixed | Number of InDesign Server instances for any use | 3 |
| InDesignServerInstancesWhiteboard | Number of InDesign Server instances reserved for Whiteboard | 3 |
| InDesignServerInstancesPrintOnDemand | Number of InDesign Server instances reserved for Preview creation | 3 |
| PdfRenderer | Either on, use a comet pdf renderer or off, do not use comet pdf renderer | off |
| PdfRendererType | Either local, use the included pdf renderer on the same host as pubserver or remote, use a remote host with a comet pdf renderer installation. | remote |
| PdfRendererRemoteHost | Address of the rendering server for comet pdf renderer | 172.27.15.18 or renderer.kontoso.com |
| PdfRendererRemotePort | First port of the comet pdf renderer instances, the others will be incremented automatically | 4711 |
| PdfRendererInstancesJob | Number of InDesign Server instances reserved for Server Jobs | 3 |
| PdfRendererInstancesMixed | Number of InDesign Server instances for any use | 3 |
| PdfRendererInstancesWhiteboard | Number of InDesign Server instances reserved for Whiteboard | 3 |
| PdfRendererInstancesPrintOnDemand | Number of InDesign Server instances reserved for Preview creation | 3 |
The installation process will create the correct settings for the renderer instances.
After an installation, changes to the renderer configuration can be done via Ison and priint:suite web application.
3.5 Installation process
When installation settings are correct, we can run the second part of the installation. This will install all components and services for Publishing Server. In order to run the installer please run:
sudo /opt/pubserver/update/<build number>/install
To see available options of installation please run with –help flag:
sudo /opt/pubserver/update/<build number>/install --help
Important! From MySql 5.7 version default user authentication method has changed. Database Engine installation is required before installer is started.
sudo ./install -n
3.6 Installation of priint:publishing server for different databases
!Important!
- for changing root user authentication password from the terminal, please make sure to use double slash "//" if you want to use slash "/" in your password.
- when updating the root password in
/opt/pubserver/etc/settings.install.xml, please make sure to escape the characters&,<,>as respectively&,<,>
3.6.1 Ubuntu Linux 20.04.1 LTS (22.04.2 LTS) with local MySql 8.0
At the time of writing this article (April 2021), the default version of MySql for Ubuntu Linux 20.04.1 LTS is 8.0. - run MySql server installation:
sudo apt-get install mysql-server
- check version of MySql after installation:
mysql --version
- login to MySql server using integrated authentication:
sudo mysql
- change root user authentication method and password:
ALTER USER 'root'@'localhost' IDENTIFIED WITH mysql_native_password BY 'insert_password';
- create priintadmin user with native authentication method:
CREATE USER 'priintadmin' IDENTIFIED WITH mysql_native_password BY 'insert_password';
- exit mysql console:
exit
-
download and deploy priint:publishing server package (point 3.2 and 3.3)
-
update root and priintadmin password in
/opt/pubserver/etc/settings.install.xml
<entry key="DBAdminPassword">insert_password</entry>
<entry key="DBPassword">insert_password</entry>
- run
sudo ./install -n
or
sudo ./install
depending on the installer version
3.6.2 Ubuntu Linux 20.04.1 LTS (22.04.2 LTS) with local MSSQL server 2019
At the time of writing this article (April 2021), only version 2019 of MSSQL is available for Ubuntu Linux 20.04.1 LTS
To install priint:publishing:
- import the public repository keys for Microsoft packages:
wget -qO- https://packages.microsoft.com/keys/microsoft.asc | sudo apt-key add
- register the Microsoft SQL Server Ubuntu repository:
sudo add-apt-repository "$(wget -qO- https://packages.microsoft.com/config/ubuntu/20.04/mssql-server-2019.list)"
- update apt-get repository:
sudo apt-get update
- run MSSQL installer (installer is being downloaded so it can take some time):
sudo apt-get install -y mssql-server
- configure MSSQL Server:
sudo /opt/mssql/bin/mssql-conf setup
-
download and deploy priint:publishing server package (point 3.2 and 3.3)
-
update entries in
/opt/pubserver/etc/settings.install.xml
<entry key="DBType">MSSQL</entry>
    <entry key="DBPort">1433</entry>
    <entry key="DBAdminUser">sa</entry>
    <entry key="DBAdminPassword">insert_password</entry>
    <entry key="DBPassword">insert_password</entry>
- run
sudo ./install
3.6.3 Ubuntu Linux with external ORACLE server
Since there is no official version of ORACLE database for Ubuntu Linux, we recommend to have database engine on external server. Installation procedure is the same for Ubuntu Linux 18.04.1 and 20.04.1 LTS.
To install priint:publishing with external ORACLE database:
-
download and deploy priint:publishing server package (point 3.2 and 3.3)
-
update entries in
/opt/pubserver/etc/settings.install.xml
<entry key="DBType">ORACLE</entry>
<entry key="DBHost">oracle_db_ip</entry>
<entry key="DBPort">1521</entry>
<entry key="DBAdminUser">sys</entry>
<entry key="DBAdminPassword">insert_password</entry>
<entry key="DBPassword">insert_password</entry>
- for Oracle Standard Edition:
<entry key="DBOracleServiceName">orcl</entry>
- for Oracle Express Edition:
<entry key="DBOracleServiceName">xe</entry>
- run
sudo ./install
- or
sudo ./install
depending on the installer version
3.6.4 Ubuntu Linux with external MySql server
Installation procedure is the same for Ubuntu Linux 18.04.1 and 20.04.1 LTS.
To install priint:publishing with external MySql database: - download and deploy priint:publishing server package (point 3.2 and 3.3)
- update entries in
/opt/pubserver/etc/settings.install.xml
<entry key="DBType">MySQL</entry>
<entry key="DBHost">mysql_db_ip</entry>
<entry key="DBPort">3306</entry>
<entry key="DBAdminUser">root</entry>
<entry key="DBAdminPassword">insert_password</entry>
<entry key="DBPassword">insert_password</entry>
- run
sudo ./install -n
or
sudo ./install
depending on the installer version
3.6.5 Ubuntu Linux with external MSSQL server
Installation procedure is the same for Ubuntu Linux 18.04.1 and 20.04.1 LTS.
To install priint:publishing with external MSSQL database: - download and deploy priint:publishing server package (point 3.2 and 3.3)
- update entries in
/opt/pubserver/etc/settings.install.xml
<entry key="DBType">MSSQL</entry>
<entry key="DBHost">mssql_db_ip</entry>
<entry key="DBPort">1433</entry>
<entry key="DBAdminUser">sa</entry>
<entry key="DBAdminPassword">insert_password</entry>
<entry key="DBPassword">insert_password</entry>
- run
sudo ./install
3.7 After installation
Installation process takes some time. After completion, the restart of the system is required in case of installation as a service.
sudo reboot
3.8 Installation summary
All files of Publishing Server are located in /opt/pubserver directory. The user pubserver is created and is the owner of this directory and also is used to run Payara service (payara_pubserver) – the main service of Publishing Server.
To start/stop/restart please use following commands:
sudo /etc/init.d/payara_pubserver start
sudo /etc/init.d/payara_pubserver stop
sudo /etc/init.d/payara_pubserver restart
3.9 Known issues
Sometimes after installation appears following error:
> **dpkg**: error processing package pubserver.X.X.X.XXXX.update (--install) : installed pubserver.X.X.X.XXXX.update package post-installation script subprocess returned error exit status 100 Errors were encountered while processing: pubserver.X.X.X.XXXX.update
Solution: Restart the Linux machine.
4 Update
4.1 Update process
The update package of Publishing Server Installer is a .deb file. It is named like
PubServer\_Update\_<version number>.<build number>\_UbuntuLinux\_<Ubuntu Version>.deb
The download process is similar to the installation routine (see point 3.2)
To deploy the package (and run updater) we need to run:
sudo dpkg -i PubServer_Update_<version number>. <build number>_UbuntuLinux_18.04.1.deb
After deploying files, it will ask if we want to run updater. This will update all components of the Publishing Server. It is possible to run it later by:
sudo /opt/pubserver/update/<buildnumber>/update
4.2 Verifying update process
To check the result of the update process you can use the Pubserver information web page:
http://<ip>:<port>/PubServerKernel
5 Migration from the former version
5.1 Migration prerequisites
If you have installed the former version of priint:publishing server for Linux (4.1.6 or 4.1.7) you will have to migrate it to the new one.
The migration is required for updating and upgrading the system in the future.
The former versions have different folder structure, i.e. there were installed in the path: /opt/pubserver/\[version number\]/
<version number> refers to 4.1.6, 4.1.7 etc.
Currently, Publishing Server is installed into: /opt/pubserver
In the case if your system is not a productive one, please consider a new fresh installation of the current version instead of migrating the previous one.
This step is related to the former versions of Publishing Server for Linux, i.e. installed in the folder /opt/pubserver/\[version number\]. If your Publishing Server is located in this path the migration is required for updating and upgrading the system in the future.
Please consider a new fresh installation of the current version instead of migrating the previous one.
5.2 Migration process
5.2.1 Path correction in repository files
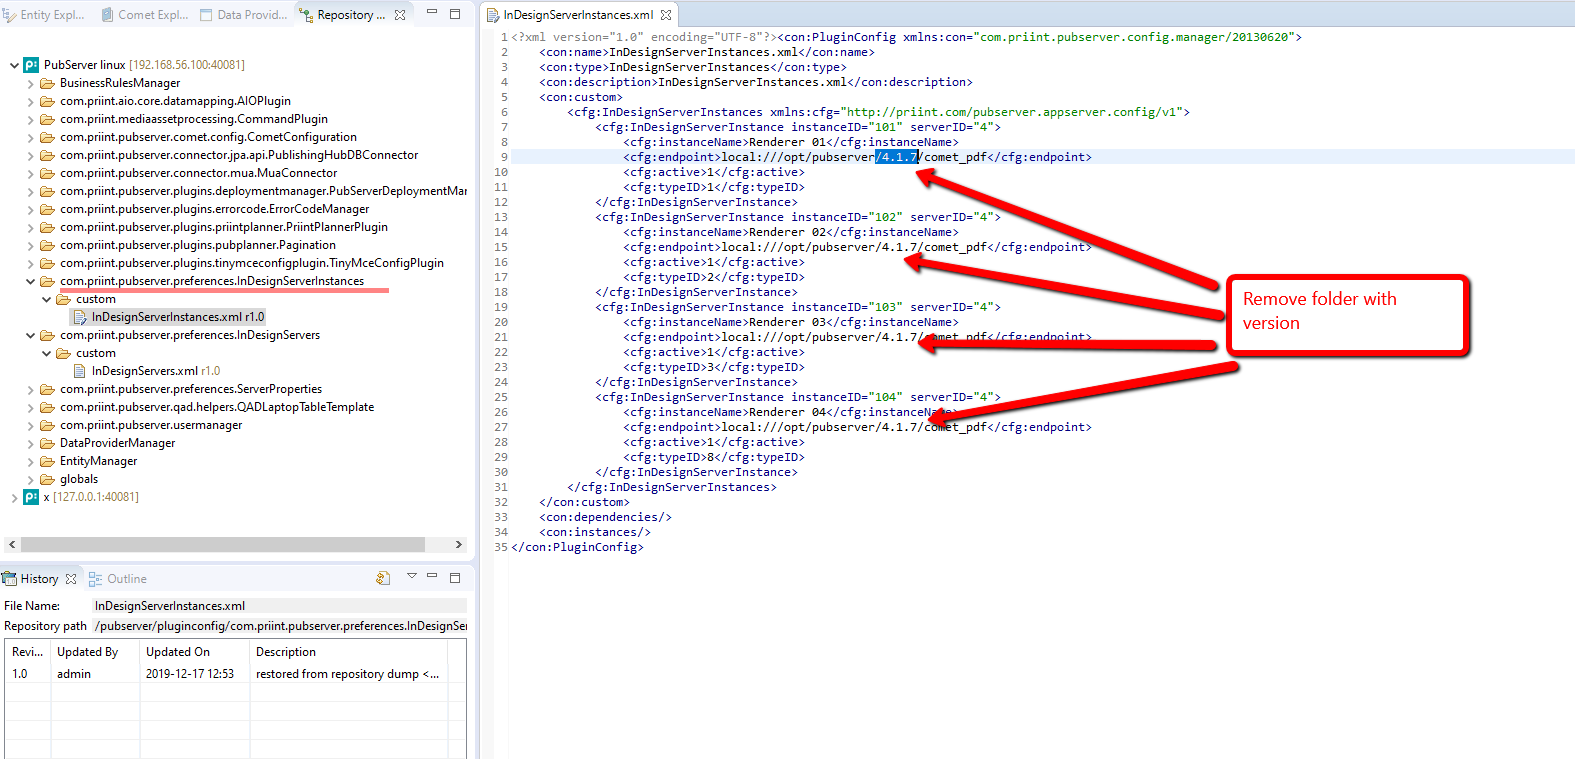
There are at least two places where the path change is required. Please correct the path removing folder with version. They are presented in the screenshots below:
Repository file: com.priint.pubserver.preferences.InDesignServerInstances/custom/InDesignServerInstances.xml
Repository file: com.priint.pubserver.preferences.ServerProperties/custom/ServerProperties.xml

5.2.2 Stopping Payara service
Please stop the payara service:
sudo systemctl stop payara_pubserver
5.2.3 Moving files to the new path
Please move the content to the proper folder, examples contain 4.1.7 version, please change to yours:
cd /opt/pubserver/4.1.7/
sudo mv * ..
cd ..
sudo rm -r 4.1.7
5.2.4 Path correction configuration files
Please correct paths in configuration files, examples contain 4.1.7 version, please change to yours:
a) settings.install.xml
sudo sed -i -e "s#/4\.1\.7##g" /opt/pubserver/etc/settings.install.xml
b) /etc/init.d/payara_pubserver
sudo sed -i -e "s#/4\.1\.7##g" /etc/init.d/payara_pubserver
5.2.5 Path correction in the database (MySQL Example)
Examples contain 4.1.7 version, please change to yours:
a) Please log into database server:
mysql -u root -p
b) Switch to the proper database:
show databases;
use priint_comet_data; -- use correct name of priint_comet_data database
c) Change paths in puc_file table (replace function used)
select distinct FILEPATH from puc_file; -- check current path
update puc_file set FILEPATH = replace( FILEPATH , '/4.1.7/' , '/' );
select distinct FILEPATH from puc_file; -- verify current path
select distinct MASTERFILEPATH from puc_file; -- check current path
update puc_file set MASTERFILEPATH = replace(MASTERFILEPATH, '/4.1.7/' , '/');
select distinct MASTERFILEPATH from puc_file; -- verify current path
d) exit
exit
5.2.6 Updating Payara service
Please reload services as follows:
sudo systemctl daemon-reload
5.2.7 Reboot the server
sudo reboot