Content module
The Content module is designed to help you view and manage content from multiple data sources seamlessly. Whether your data is returned via REST connectors or MUA connectors, the module provides an organized, unified view of your content. It displays your data in a tree-table format, making it easy to browse, search, and manage. Additionally, you can run processes from Camunda workflows directly from the Content module.
Notice
The full functionality of this module is based on the Entity model, which assumes that the data source is stored in the internal server. If you attempt actions such as add, edit, or delete on entities returned from a REST connector, these actions may not work as expected. Be cautious when interacting with external data sources, as it may cause confusion in the UI.
Key components of the Content module in AdminUI
Before you start using the Content module, let's quickly review the key
components that simplify content management within AdminUI:
-
Tree-Table View: Provides a clear, organized structure for your content. You can easily expand or collapse categories to find the content you need quickly.
-
Search function: Offers two options:
-
Advanced search for filtering content from the internal PubServer database using multiple criteria.
-
Instant search for real-time filtering by labels or identifiers across both internal and external data sources at the first level.
-
-
Layout design: The layout is designed to be logical and well-structured, with proper spacing and alignment, allowing for smooth content management.
-
Dynamic forms: Streamline the process of adding or editing content through Camunda processes. These forms ensure that only content-related processes are available for selection, with helpful error messages guiding you to ensure data accuracy.
-
Feedback and notifications: As you work with content, feedback messages - including confirmation alerts and error notifications - will notify you of the success or failure of your actions.
Accessing the Content module
To access the Content module, you must have the necessary permissions. Ensure you have the correct access rights assigned by your admin.
Steps to access the Content module:
-
Open the AdminUI application.
-
Locate the Content in the navigation panel and click on it.
-
You'll see your content displayed in a Tree-Table format, allowing you to browse structured content easily.
Execute Generic process for Content
The Generic process allows you to trigger dynamic forms based on the selected process type, specifically for content management. This process provides flexibility and control over your content tasks.
Accessing the Content process:
-
Click on the Content option in the dropdown menu at the top right corner of the interface.
-
This will navigate you to a dynamic form filtered by the Content process type.
Form layout and selection:
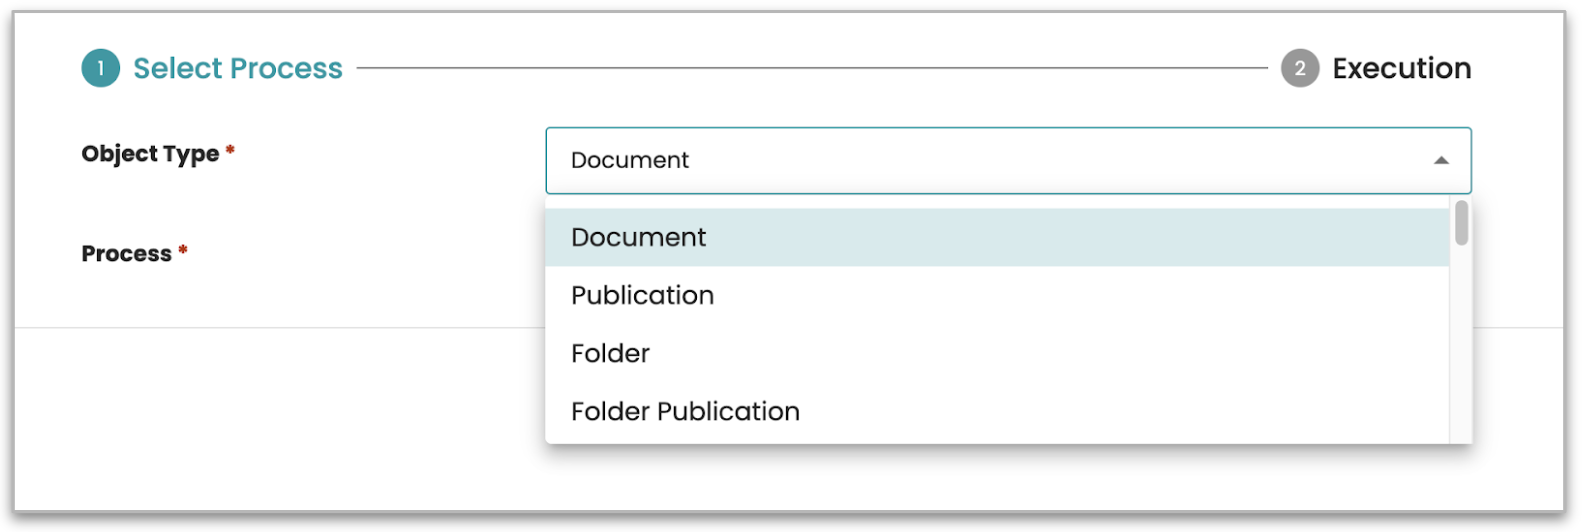
-
Object Type: When you open the form, the Object Type dropdown will appear at the top. This dropdown lets you choose the type you want to manage. After selecting an Object Type, the process will automatically update to display only the available processes based on your selection.
-
Dynamic Form: After selecting the process, the form will display the relevant fields for managing the selected content type. These fields include available processes defined and assigned to the selected Object Type, such as processes for creating, editing, or deleting buckets.
-
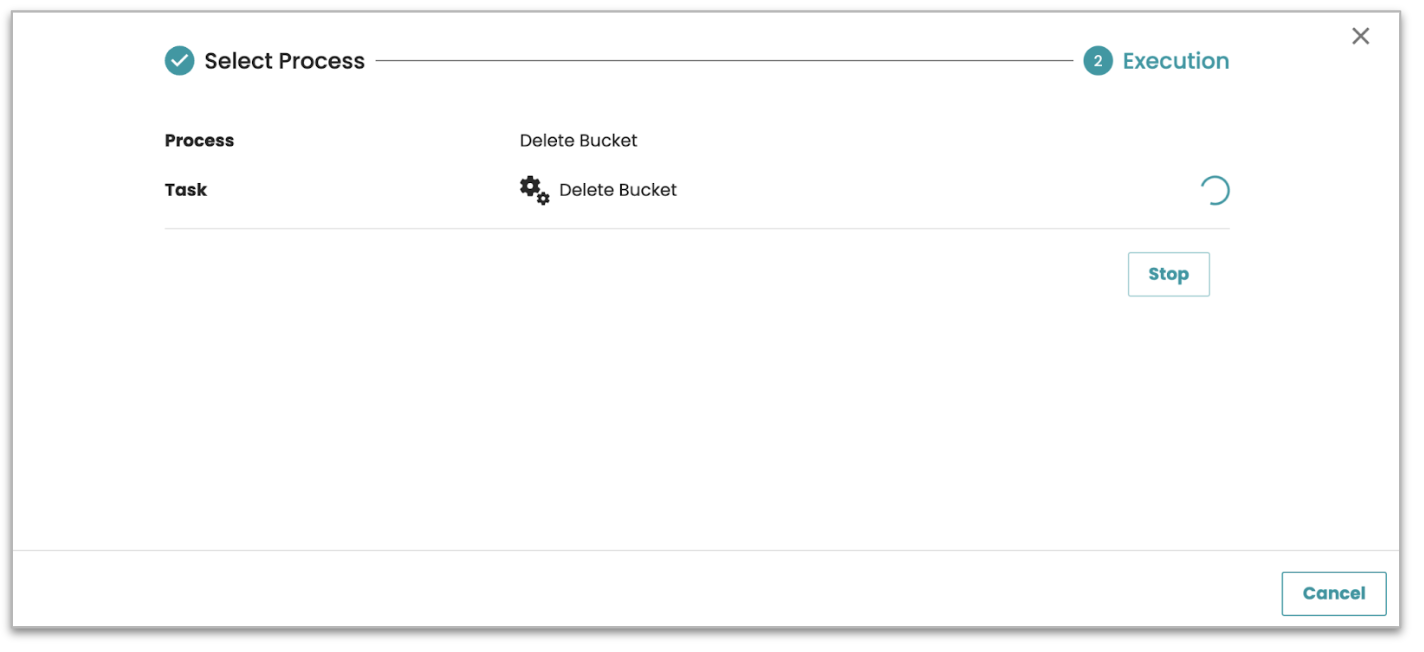
Execution: After selecting the necessary options, click Execute to apply the selected process. You can click the Stop button below to cancel the operation.
Sending IDs to Bulk selection and running process
When you need to execute a task like importing content entity data into selected buckets from the list, the system will automatically capture the selected IDs and send them as part of the process. This is handled via the ObjectIDs parameter, ensuring that the task is performed while you remain in the UI without the need for extra navigation.
How it works:
The system recognizes the IDs of the selected buckets and passes them to the process when triggered by various UI actions. Whether you're making a single selection or a bulk selection, the IDs will be sent to the relevant process as shown in the steps below.
Bulk selection:
Trigger: Select multiple buckets from the list (check the checkboxes).
Action: Click the "three dots" in the header and select the available process or click on the Content option in the dropdown menu at the top right corner.
Process execution: The system captures the IDs of the selected items and sends them to the ObjectIDs parameter in the request payload for further processing.
Single selection:
Trigger: Select a single content entity.
Action: Click the three-dot menu (⁝) next to the selected item, or click on the Content button on the top right or in the content entity tab on the right side.
Process execution: The system captures the ID of the selected content entity and sends it to the ObjectIDs parameter to trigger the corresponding process.
Viewing Content Data in Tree-Table Mode
The Tree-Table is the main feature of the Content module. It allows you to view content in a well-organized and intuitive way. This view combines the Treeview and a table, where the Label and Identifier columns are displayed by default.
Expanding and collapsing Items
-
To view sub-items under a category, click the > (expand arrow) icon next to it.
-
To collapse and hide sub-items, click the V (forward arrow) icon.
Adding More columns to the Tree-Table
The Add More columns icon allows you to customize the content displayed
in the Tree-Table. By clicking on this icon, a list of available
attributes for the viewing content will appear.
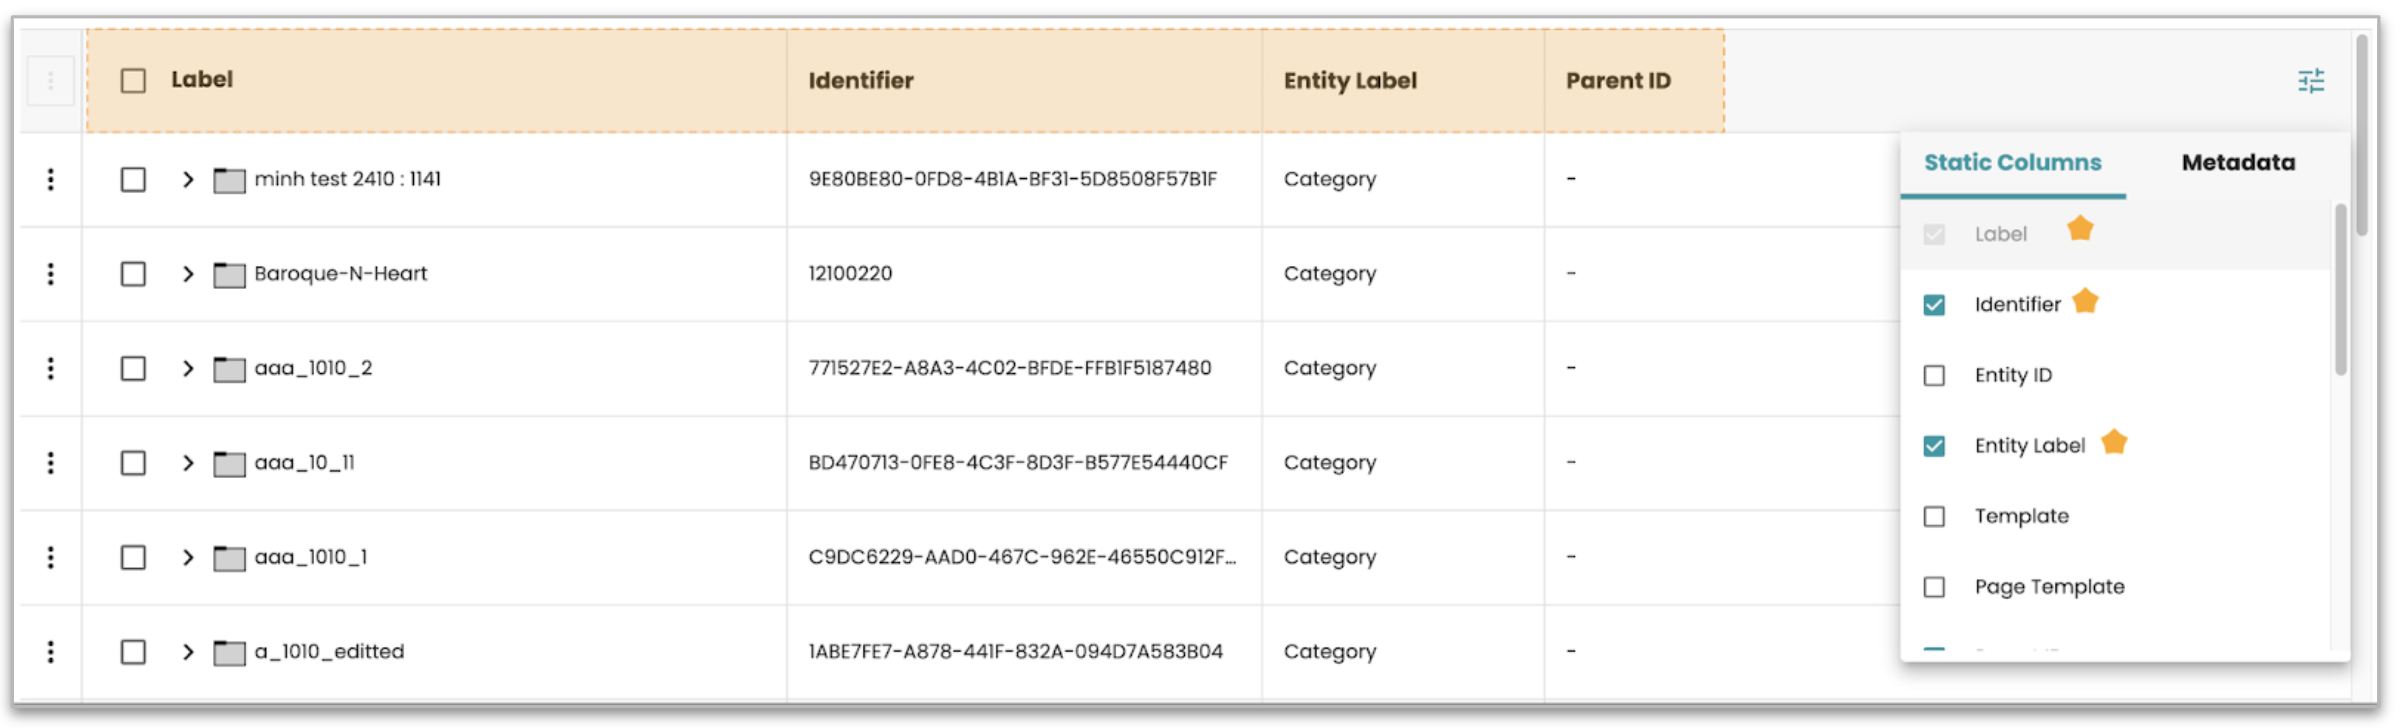
How to Add More columns:
-
Click the Add More columns icon.
-
A list of available attributes will be displayed in 2 tabs, including options like Label, Identifier, Entity ID, Entity Label, Template, and Page Template.
-
Check the boxes next to the attributes you want to display in the Tree-Table.
-
The selected columns will appear in the Tree-Table for your current view.
Applying changes:
Any changes made (such as selecting additional columns) will be saved locally, meaning they will persist across sessions as long as you're using the same browser.
This functionality provides a flexible and user-friendly way to tailor the content display to your preferences.
Sorting by Label
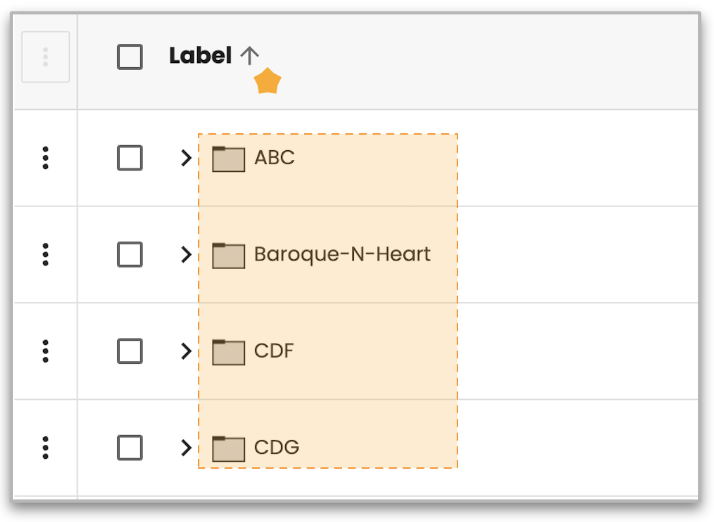 You can sort the content in the Tree-Table List by clicking on the Sort
icon next to the Label column. This sorting functionality applies only
to the root level of the tree and follows an alphabetical order rule.
This allows you to quickly arrange content items at the root level for
easier navigation and management.
You can sort the content in the Tree-Table List by clicking on the Sort
icon next to the Label column. This sorting functionality applies only
to the root level of the tree and follows an alphabetical order rule.
This allows you to quickly arrange content items at the root level for
easier navigation and management.
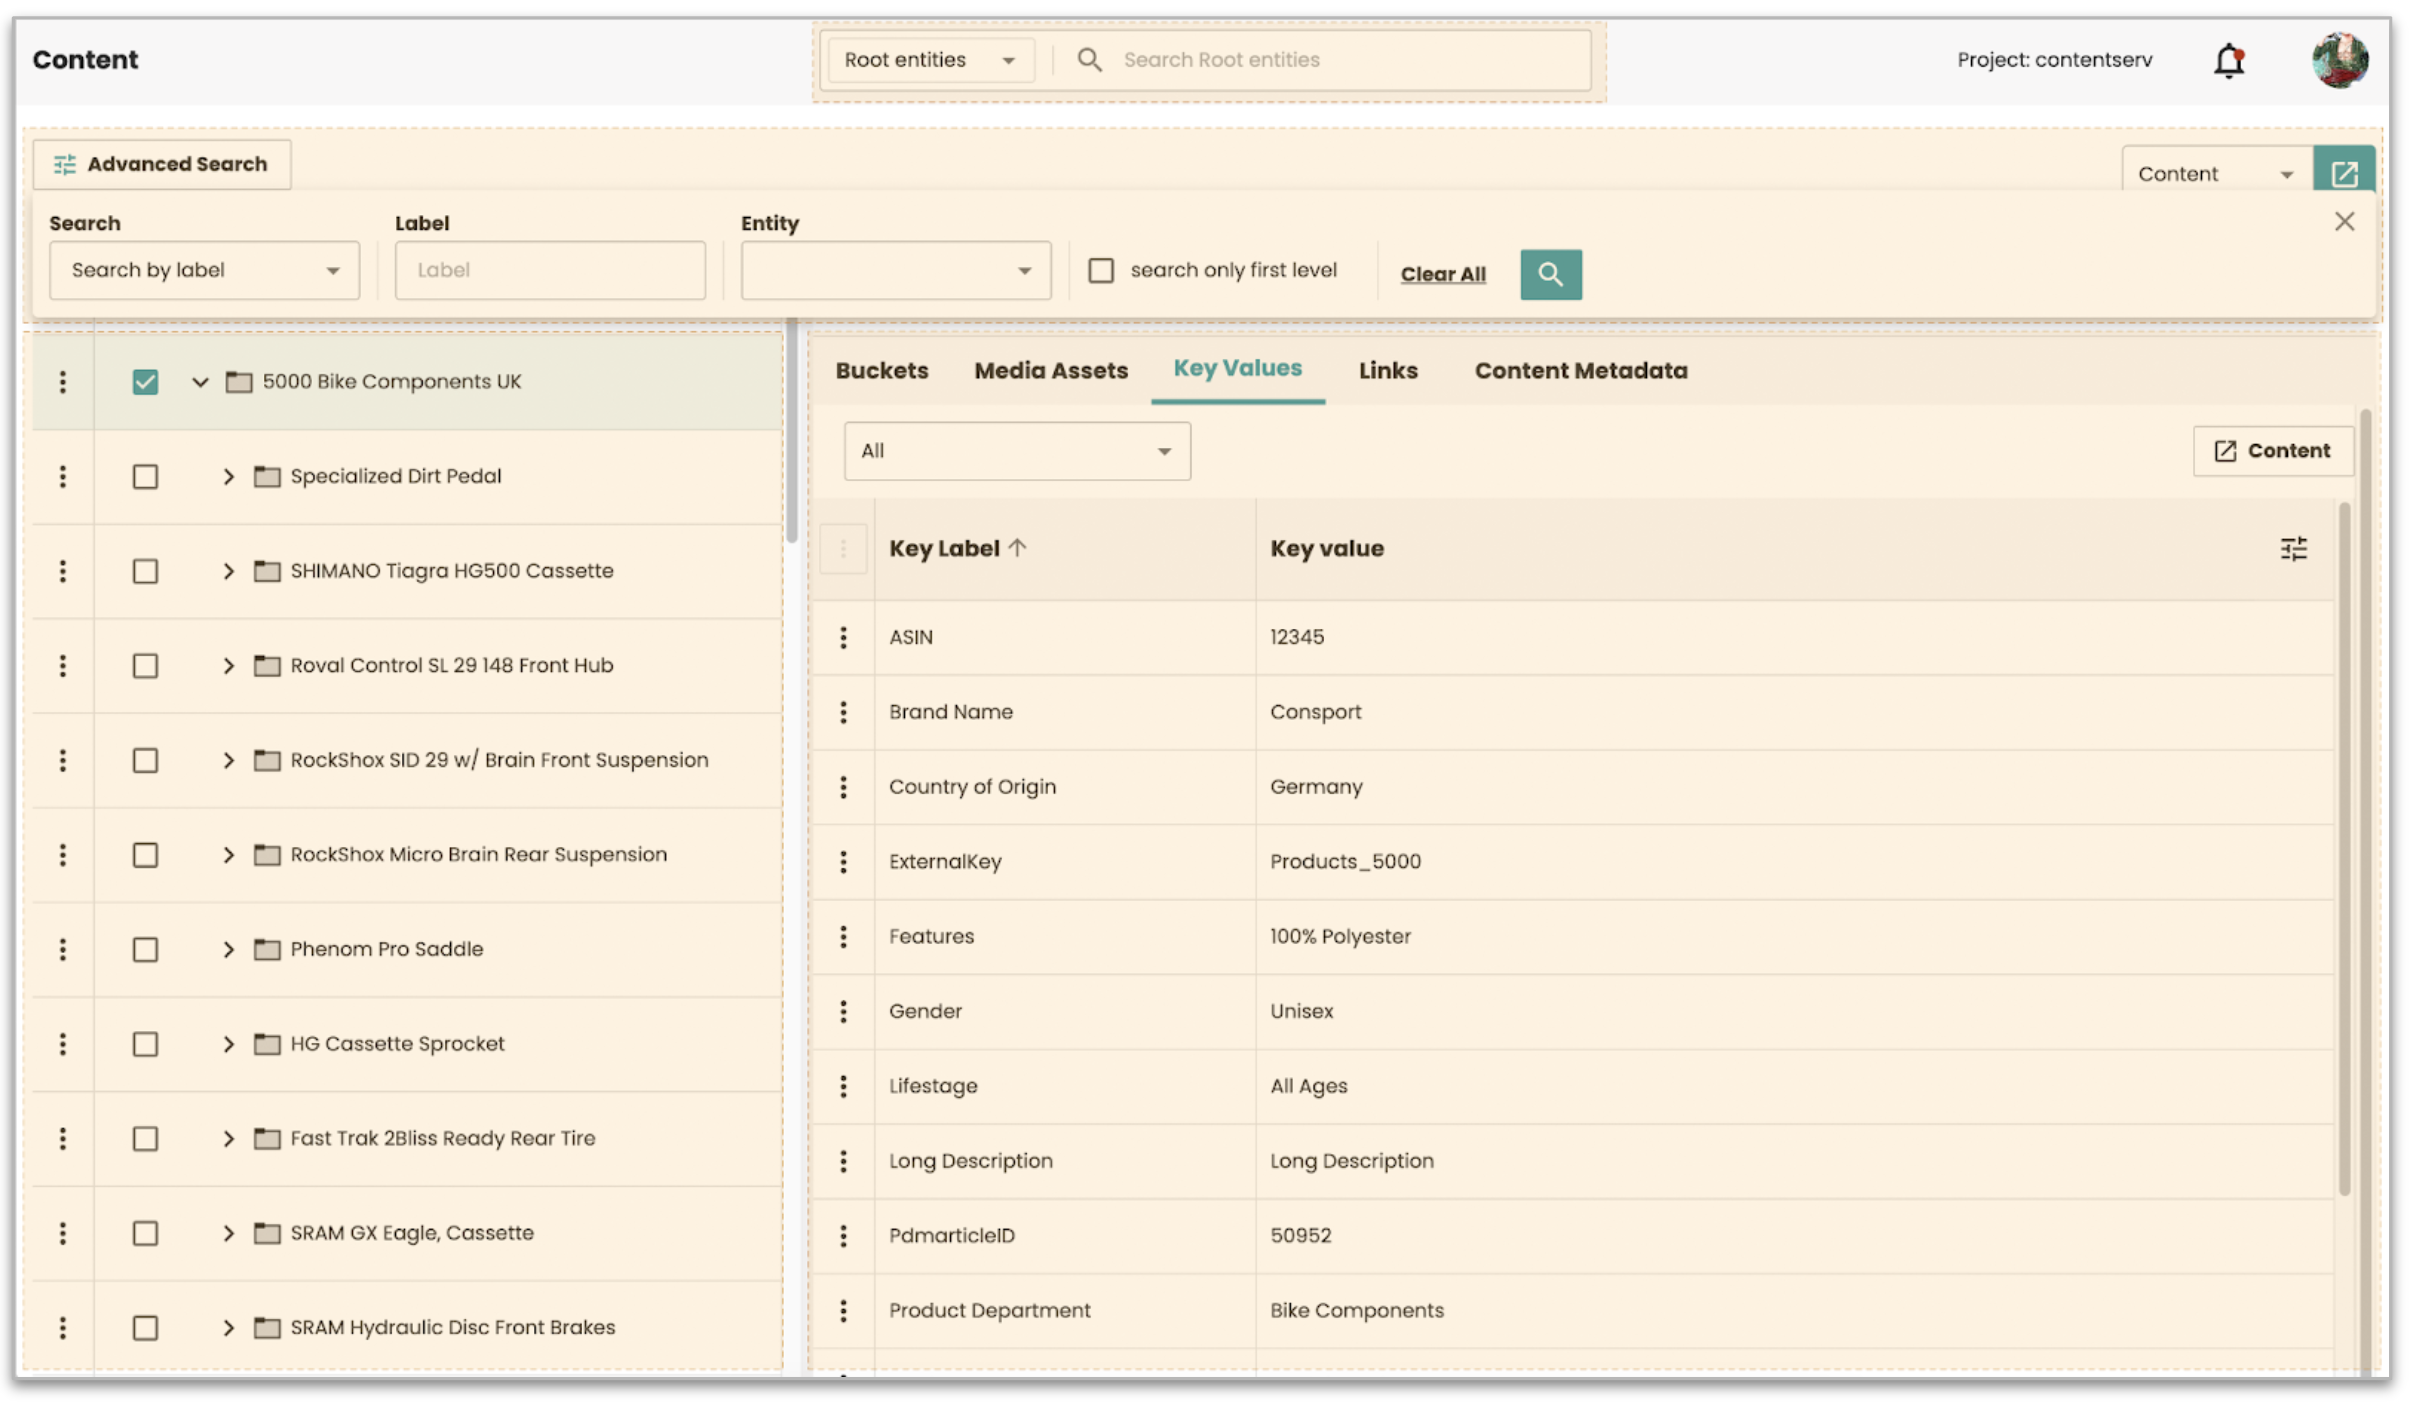
Viewing Data of Content Entities
When you select an item from the Tree-Table, the right panel will
display important details such as:
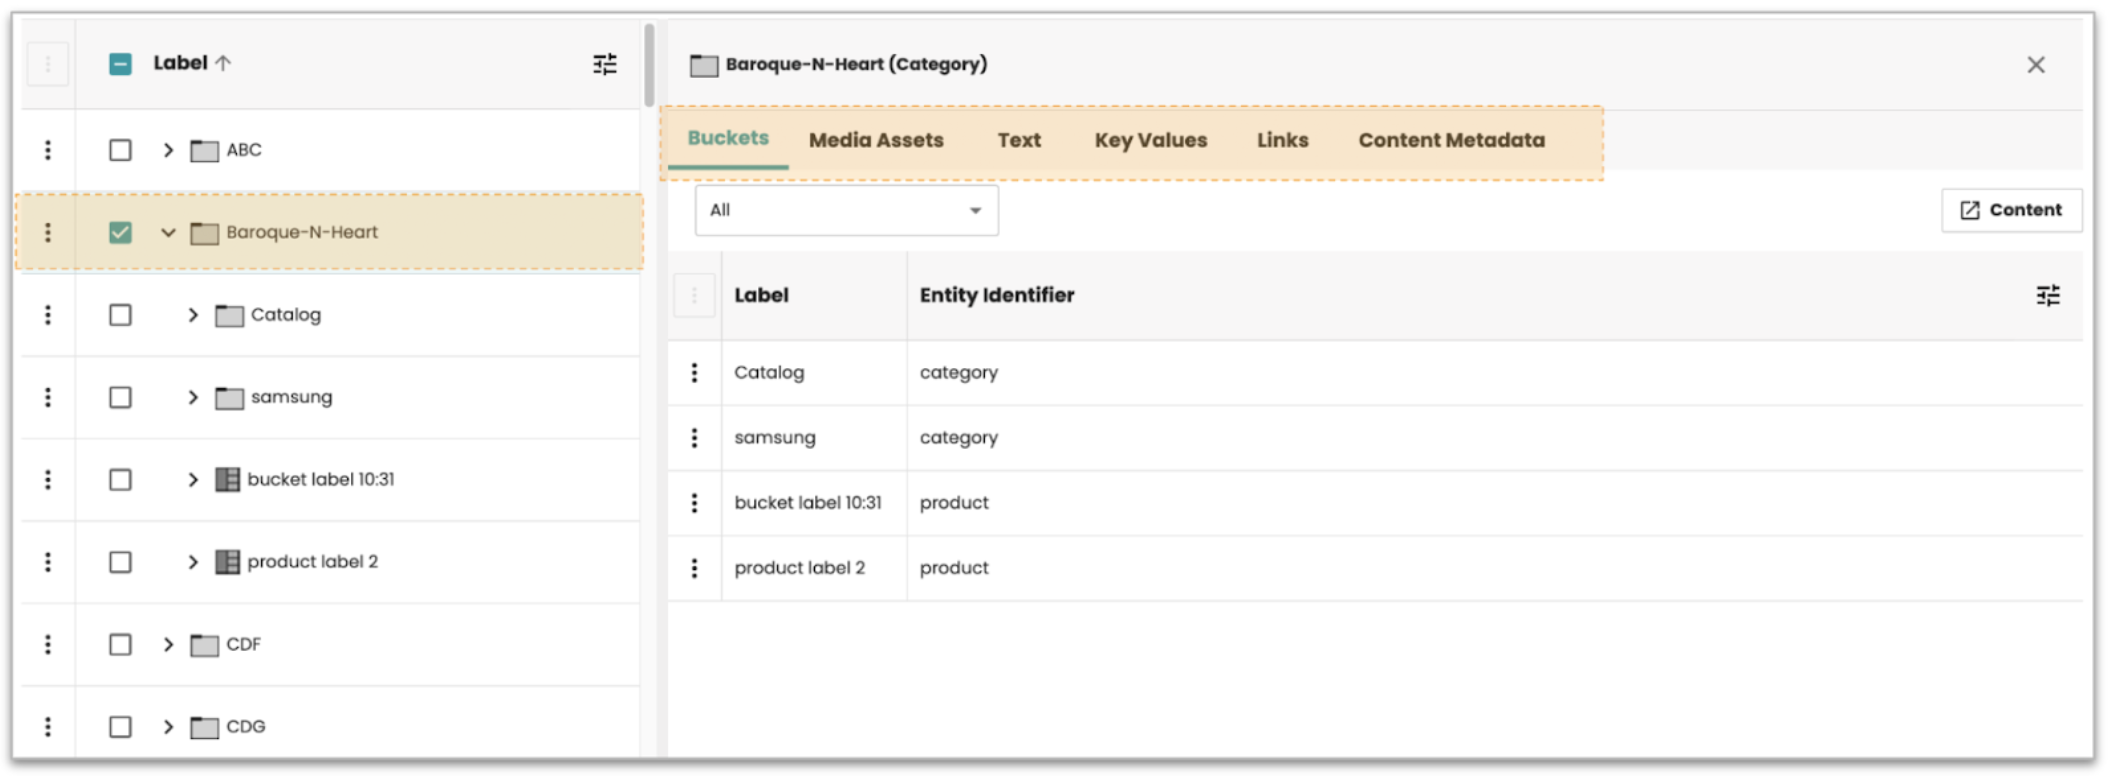
-
Buckets: Grouped content items.
-
Media Assets: Images, videos, and other media files.
-
Text
-
Key Values
-
Links
-
Content metadata
-
Other relevant details associated with the selected item.
Managing Buckets
You can create, edit, and delete buckets directly from the content list using the options available in the context menu.
Create a new Bucket:
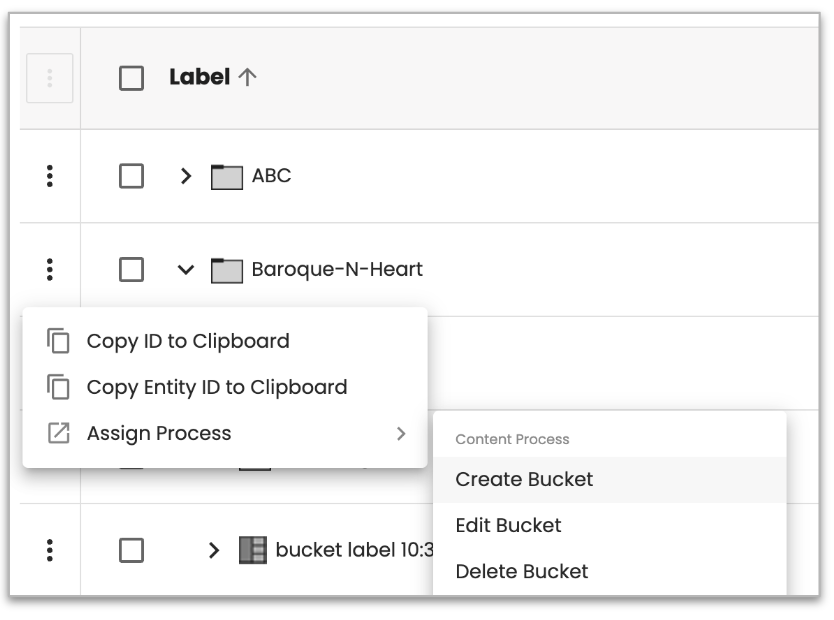
-
Select the checkbox next to the item where you want to create a new bucket.
-
Click the three-dot menu (⁝) next to the selected item.
-
From the dropdown menu, click Assign Process.
-
In the Content process section, select Create Bucket.
-
The dynamic form will open, where you can fill in details like the Bucket Label and other relevant fields.
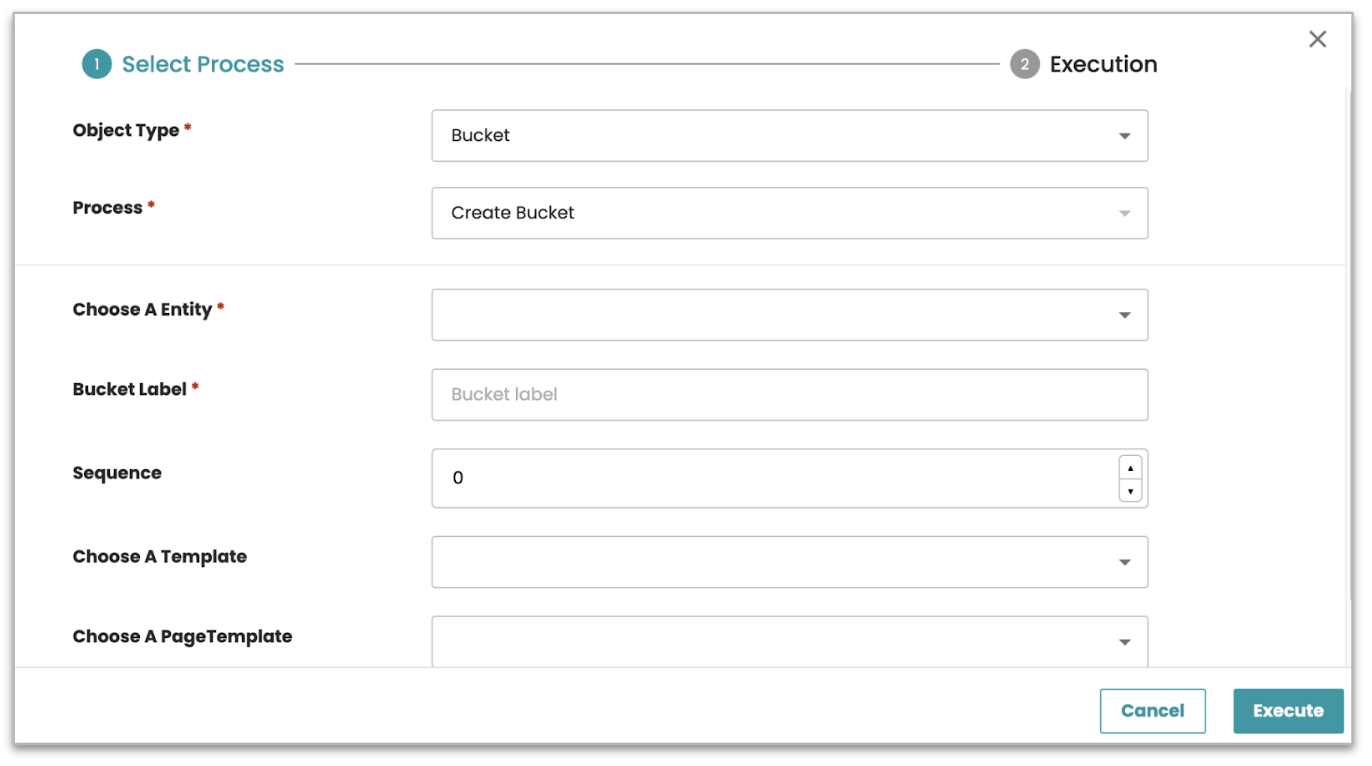
-
After entering the required information, click Execute to create the bucket.
Edit an existing bucket:
-
Select the checkbox next to the bucket you want to edit.
-
Click the three-dot menu (⁝) next to the selected item.
-
From the dropdown, click Assign Process.
-
In the Content process section, select Edit Bucket.
-
The dynamic form will appear, allowing you to update the bucket details.
-
After making the changes, click Execute to save the updates.
Delete a bucket:
-
Select the checkbox next to the bucket you want to delete.
-
Click the three-dot menu (⁝) next to the selected item.
-
From the dropdown, click Assign Process.
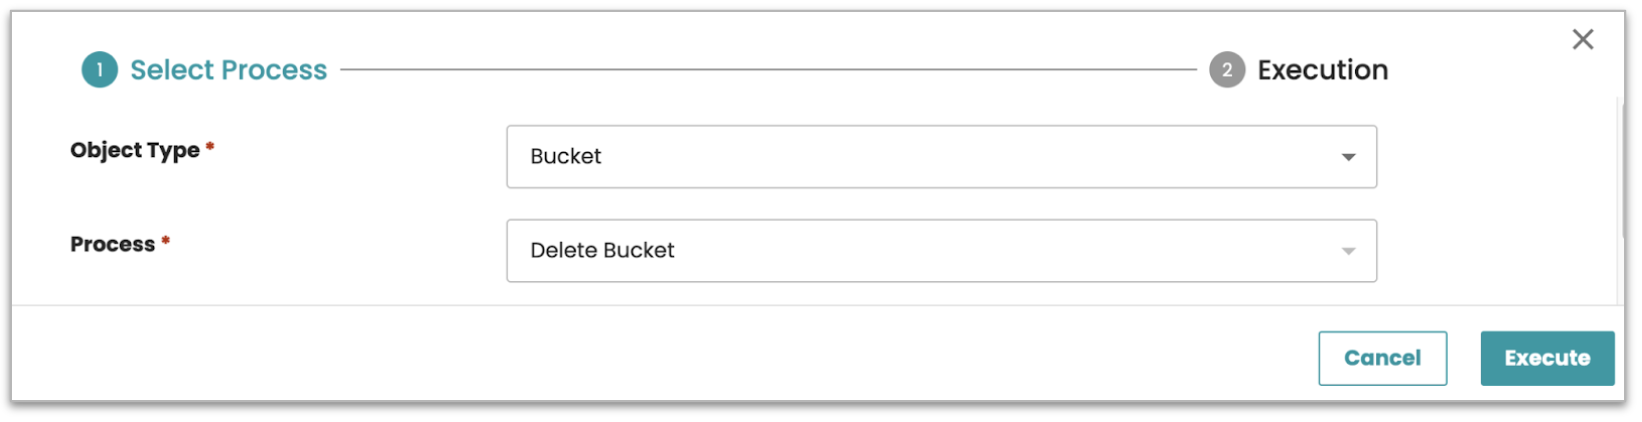
-
In the Content process section, select Delete Bucket.
-
The deletion process will be applied, and the selected bucket will be removed from the system.
Managing Content entities
You can create, edit, or delete content entities directly from the
content list by using the available options in the context menu.
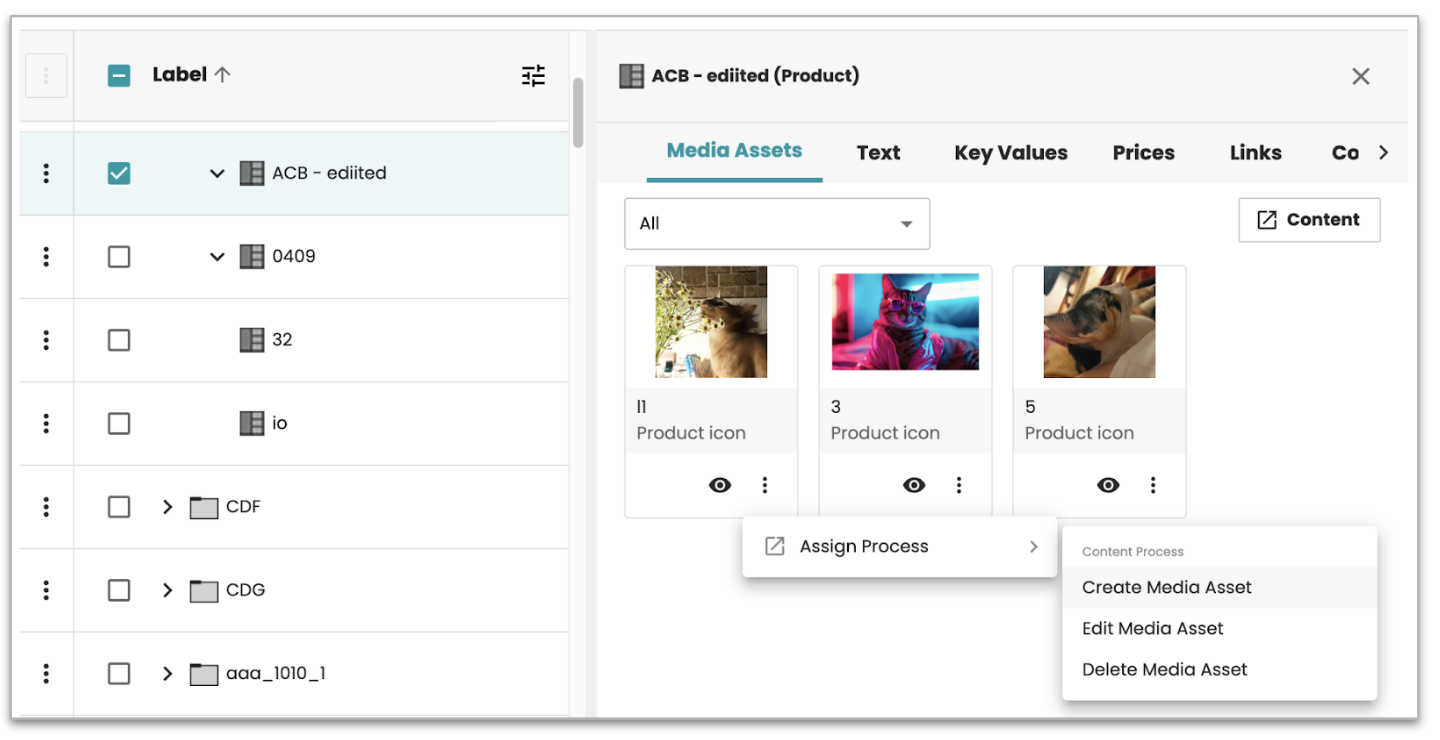
Create a new content entity:
-
Select the Content icon on the top right to create a new content entity.
-
The dynamic form will open, allowing you to enter details.
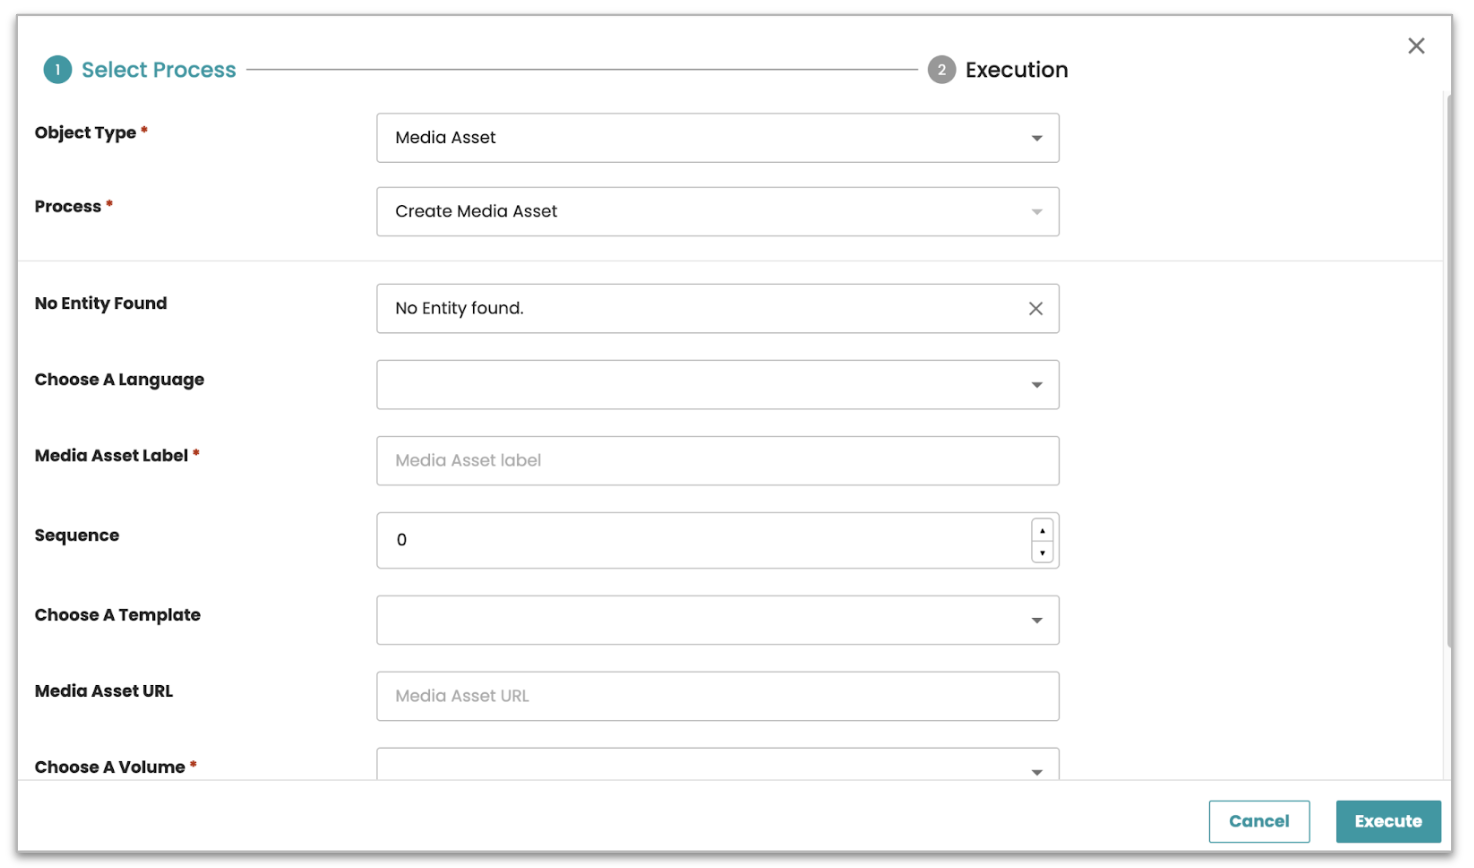
-
After entering the necessary information, click Execute to create the content entity.
Edit an existing content entity:
-
Select the checkbox next to the content entity you want to edit.
-
Click the three-dot menu (⁝) next to the selected item.
-
From the dropdown, click Assign Process.
-
In the Content process section, select Edit
{name}(or the appropriate process for editing the entity). -
The dynamic form will appear, allowing you to update the entity details.
-
Once you've made the necessary changes, click Execute to apply the updates.
Delete a content entity:
-
Select the checkbox next to the content entity you want to delete.
-
Click the three-dot menu (⁝) next to the selected item.
-
From the dropdown, click Assign Process.
-
In the Content process section, select Delete
{name}(or another relevant delete process). -
Confirm the deletion action, and the content entity will be removed from the system.
Manage Content metadata
The Content metadata section allows you to efficiently manage metadata for a selected bucket or attribute within the Content module. This enables you to update Content metadata directly in the interface without navigating away to a separate screen.
Accessing Content metadata
-
Content metadata for buckets: When selecting a bucket (e.g., Product, Category, Bucket), the Content metadata tab will appear, displaying metadata for the selected entity.
-
Inline Content metadata for attributes: If you select an inline attribute value (e.g., Key Value, Text), the corresponding Content metadata will be shown in the same section, allowing you to view and update metadata for that specific value.
Managing Content metadata
- Viewing Metadata: The Content metadata list is displayed in a tree view, where you can expand or collapse metadata items to see child metadata. Expandable items are clearly marked with an arrow icon.
Adding, Editing, and Deleting Metadata
-
Add new Metadata:
-
Select the metadata item and click the plus icon to add a new value.
-
Each metadata value has the following attributes: ID, Value, and Sequence.
-
ID and Value can be updated.
-
Sequence is auto-generated and cannot be modified.
-
-
-
Edit Metadata:
-
Click on the metadata value you wish to edit and choose the clock icon to unlock the value.
-
After unlocking, you can update the ID and Value fields. The Sequence field remains uneditable.
-
-
Delete Metadata:
- To remove metadata, click on the item and select the remove icon to delete it from the list.
Sorting and visual representation
-
Sorting metadata: You can sort metadata by dragging and dropping the items, allowing for flexible organization of the metadata fields.
-
The UI should update dynamically as you interact with the metadata, providing a clear and intuitive experience.
Saving changes and notifications
-
Any changes made to the Content metadata are saved automatically when you enter or leave the cell with the updated value.
-
A toast message will notify you of the update status, displaying messages like: "Changes Saved! " Indicates that your changes have been successfully saved.
Note: This option only appears if the selected entity or attribute has content metadata configured in the Entity model settings. If no content metadata is configured for that entity or attribute, the Content metadata section will not be available.
Advanced search feature
The Advanced search feature allows you to efficiently filter and locate content based on various criteria, helping you quickly find and manage the content you need.
Accessing Advanced search:
The Advanced search button is located at the top of the Content module. Click the button to open the search panel.
Search Criteria and Options:

-
Once you click on Advanced search, a panel will appear with a dropdown menu displaying available search criteria options.
-
By default, the first option in the list (e.g., "Default search") will be selected. You can choose another search criteria by clicking on the dropdown.
-
The available search criteria are dynamically populated based on the configurations set by the admin. This may include filtering by entity type, metadata fields, or other relevant attributes.
Applying search criteria:
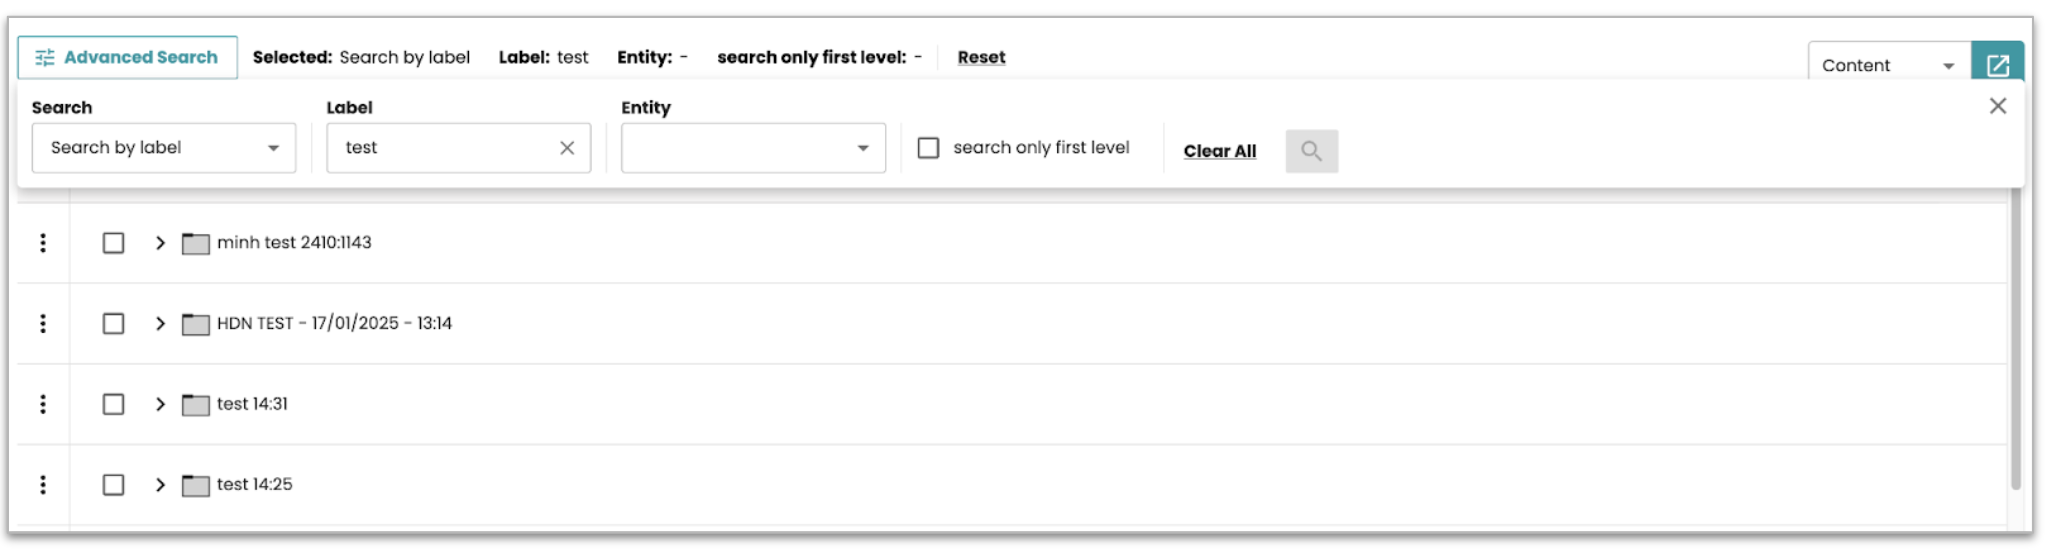
-
After selecting your desired search criteria (or multiple criteria), enter the appropriate values to filter the content list.
-
Click the Search button to execute the query. The results will be filtered based on the selected criteria.
-
If no matching data is found, a message will appear saying "No data found."
Clearing and Resetting the search:
-
To clear all search fields and return to the initial page, click the Clear All option.
-
You can also click the Reset button to remove any applied filters and return to the default view.
Viewing Search results:
The search results will be displayed in a list view, showing only the items that meet your search criteria.
Closing the Search panel:
- After reviewing the results, click the Close icon in the right corner of the panel to close the Advanced search options. The selected search criteria will be captured and displayed in the snapshot for your reference.
Admin Configuration:
- In the backend, admins can configure the available search criteria options. Admins can add, edit, or delete criteria and configure the default search displayed in the Advanced search panel.
Limitations for Data via REST Connector:
- It is important to note that the Advanced search functionality works only for data stored in the internal PubServer database. Currently, this feature does not support data fetched via REST connectors. If you are searching for content that is returned from an external REST connector, the Advanced search filters will not be applied to that data.
Instant search
The Instant search feature provides a quick and efficient way to find content based on labels or identifiers within the bucket list. As you type in the search bar, the results will update dynamically, allowing you to quickly locate relevant content based on your search criteria.
Accessing Instant search:
The Instant search bar is located at the top of the Content page, alongside the entity selection dropdown.
Performing an Instant search:
-
Search without selecting an entity: If you don't select any entity from the dropdown, the search will be applied to all available entities. The system will search the labels or identifiers of the bucket list displayed at the first level of the Tree-Table.

-
Search with an entity selected: If you select an entity from the dropdown, the search will be restricted to that specific entity. The system will search for matches within the labels or identifiers of the bucket list related to the selected entity.
Search behavior
-
As you start typing in the search bar, Instant search will trigger automatically, filtering results in real-time.
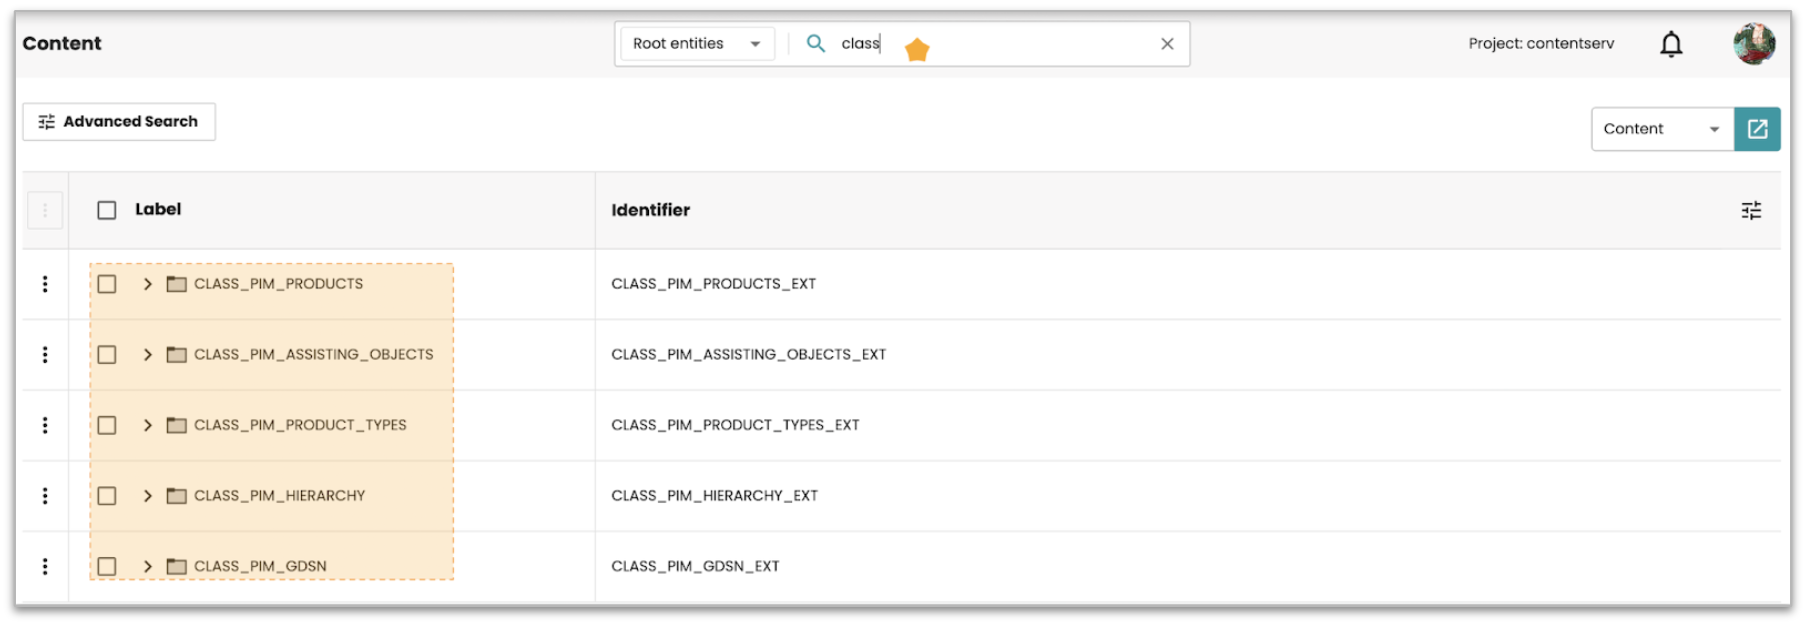
-
The search results will appear in a listview below the search bar.
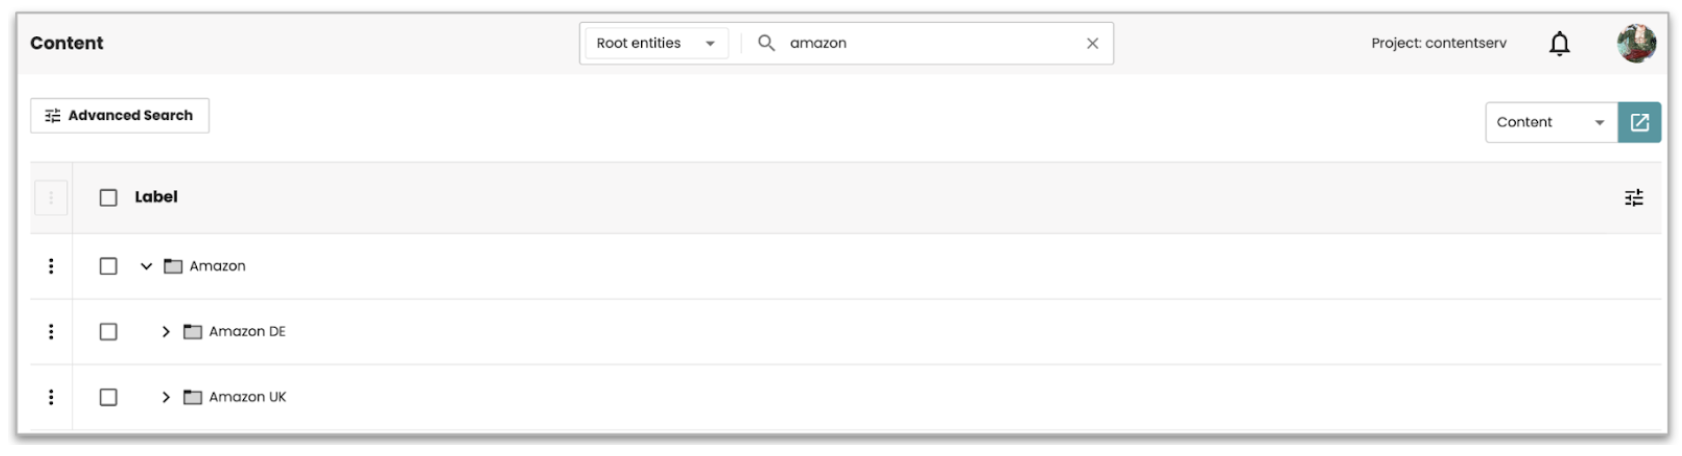
-
Results are updated dynamically as you type new keywords or adjust your query.
-
If no results match the search criteria, a "No data found." message will appear on the page.

Works across all data sources, including REST connectors:
Instant search allows you to quickly search and filter content by labels or identifiers, even when the data comes from an external REST connector. While Advanced search only works with internal data, Instant search can be used to find content at the first level across both internal and external data sources.
