Processes Panels
Processes for the integrated Camunda server can be manipulated here. In later versions other configuration possibilities might be available here. In the left panel the different setting topics can be selected.
1 Element templates
The Element Templates grid allows for creating, uploading and editing user/service task's template. Every time the user saves a template, a new revision will be created.
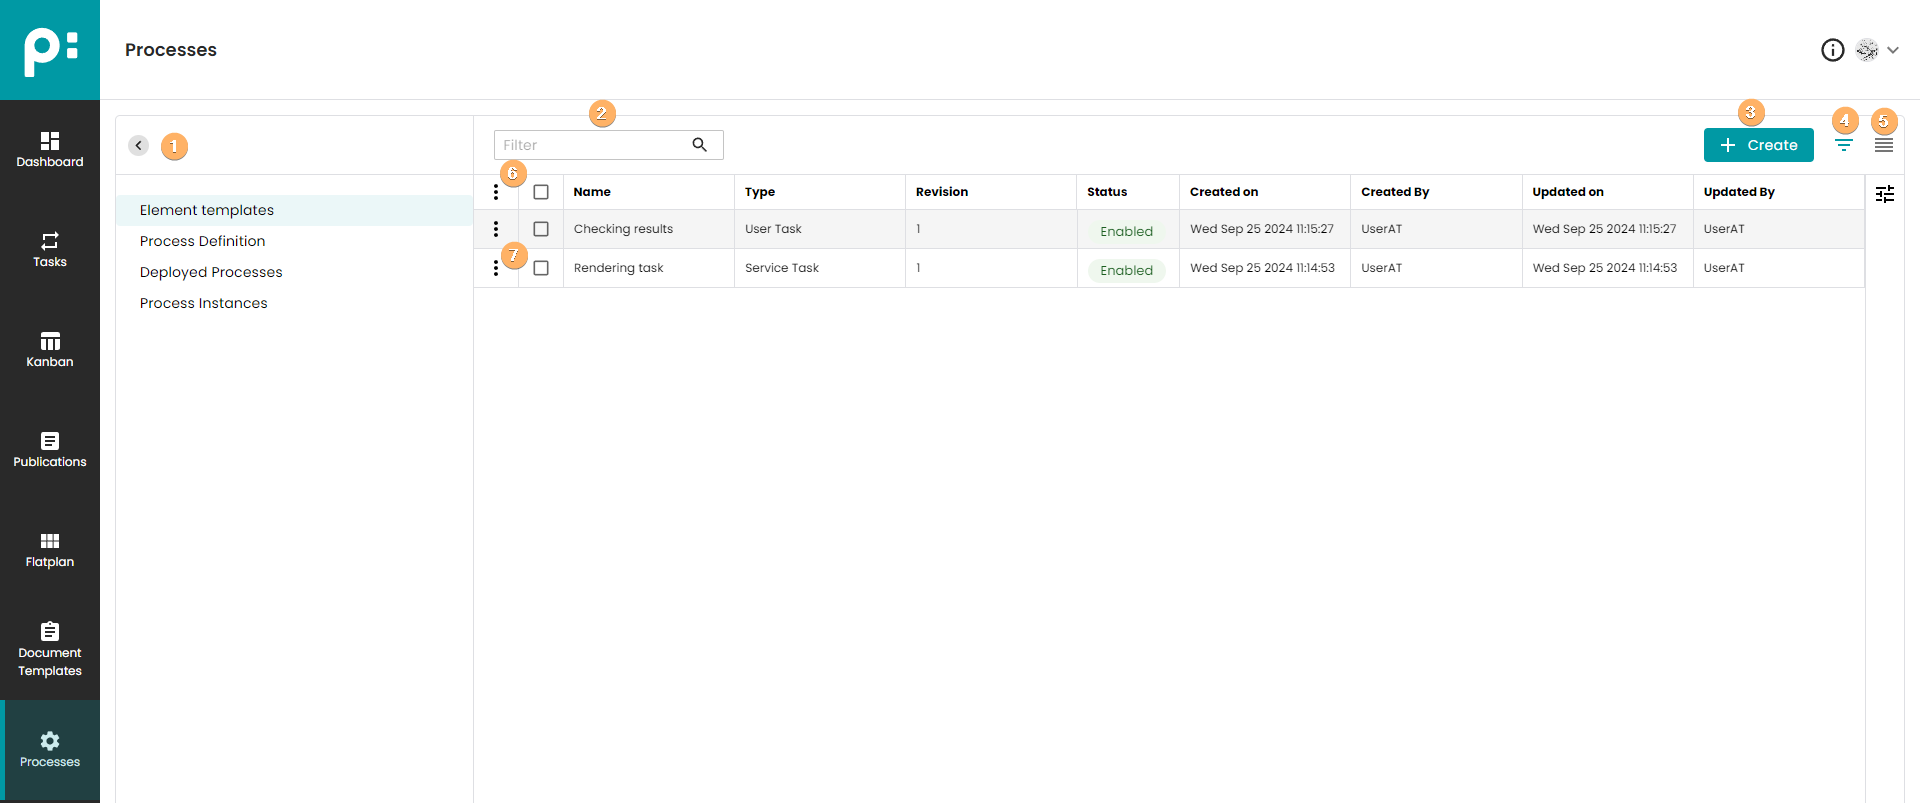
- The left pane shows the setting topics. Select a topic by clicking on it. The pane can be hidden by the angle button.
- This search will filter the existing element templates.
- Create a new element template by clicking the Create button. The template editor explained below will open with a service task event only.
- The focus view mode will only show the latest revision of every element template.
- The full view mode will show all revisions of the element templates.
- The multi-selection context menu provides the following commands:
- Disable: disable selected element templates. When element process status is set to disable, then this revision of element template cannot be used in modeler.
- Enable: enable selected element templates. When element process status is set to enable, then this revision of element template can be used in modeler.
- Delete All Revisions: removing all element template revisions which are selected in grid.
- The single-selection context menu provides the following commands:
- View: opens element template editor in read-only mode.
- Edit: open element template editor.
- Disable: disable element template. When element process status is set to disable, then this revision of element template cannot be used in modeler.
- Enable: enable element template. When element process status is set to enable, then this revision of element template can be used in modeler.
- Delete All Revisions: removing all element template revisions.
1.1 Element Template Editor
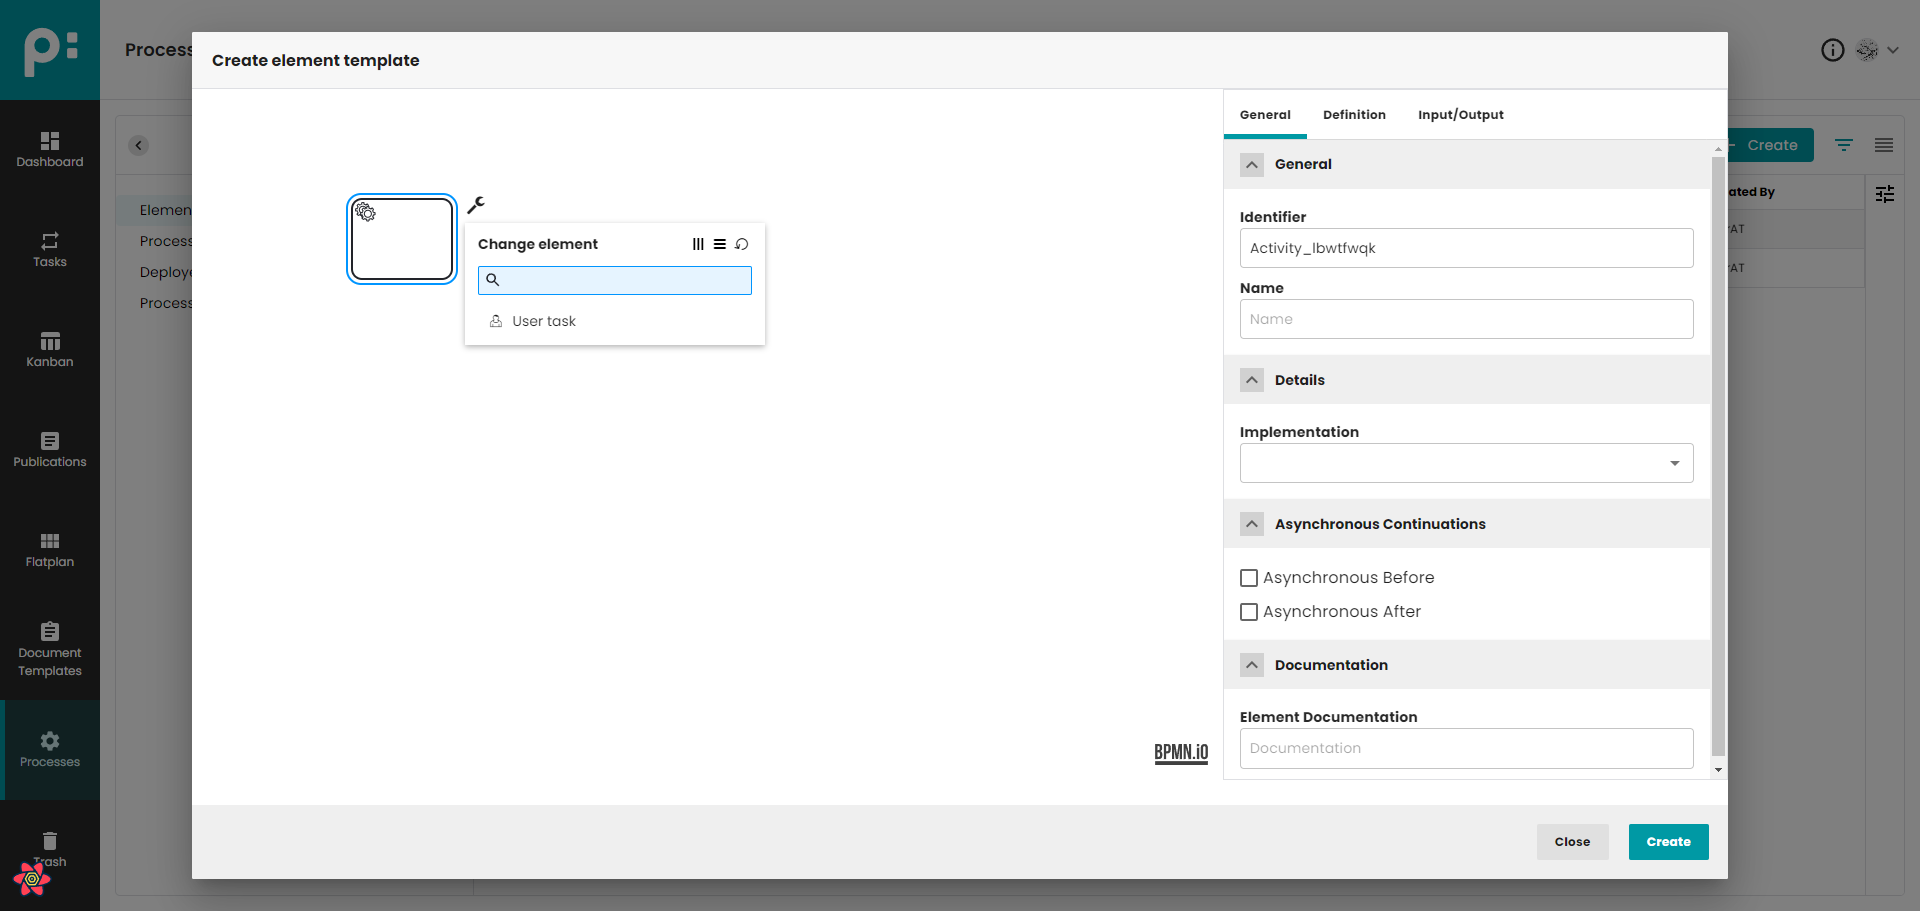
In this dialog, user has possibility to create/change element template. There are two types of elements that can be templates (service task/user task). They can be changed using the key button that is visible in the image above. All parameters set in the template element will be copied to the element where the template will be used. A template can only be used for a service or user task, and depending on its type, appropriate templates will be displayed.
2 Process Definition
The Process Definition grid allows for creating, uploading and editing processes. Every time the user saves a process, a new revision will be created.
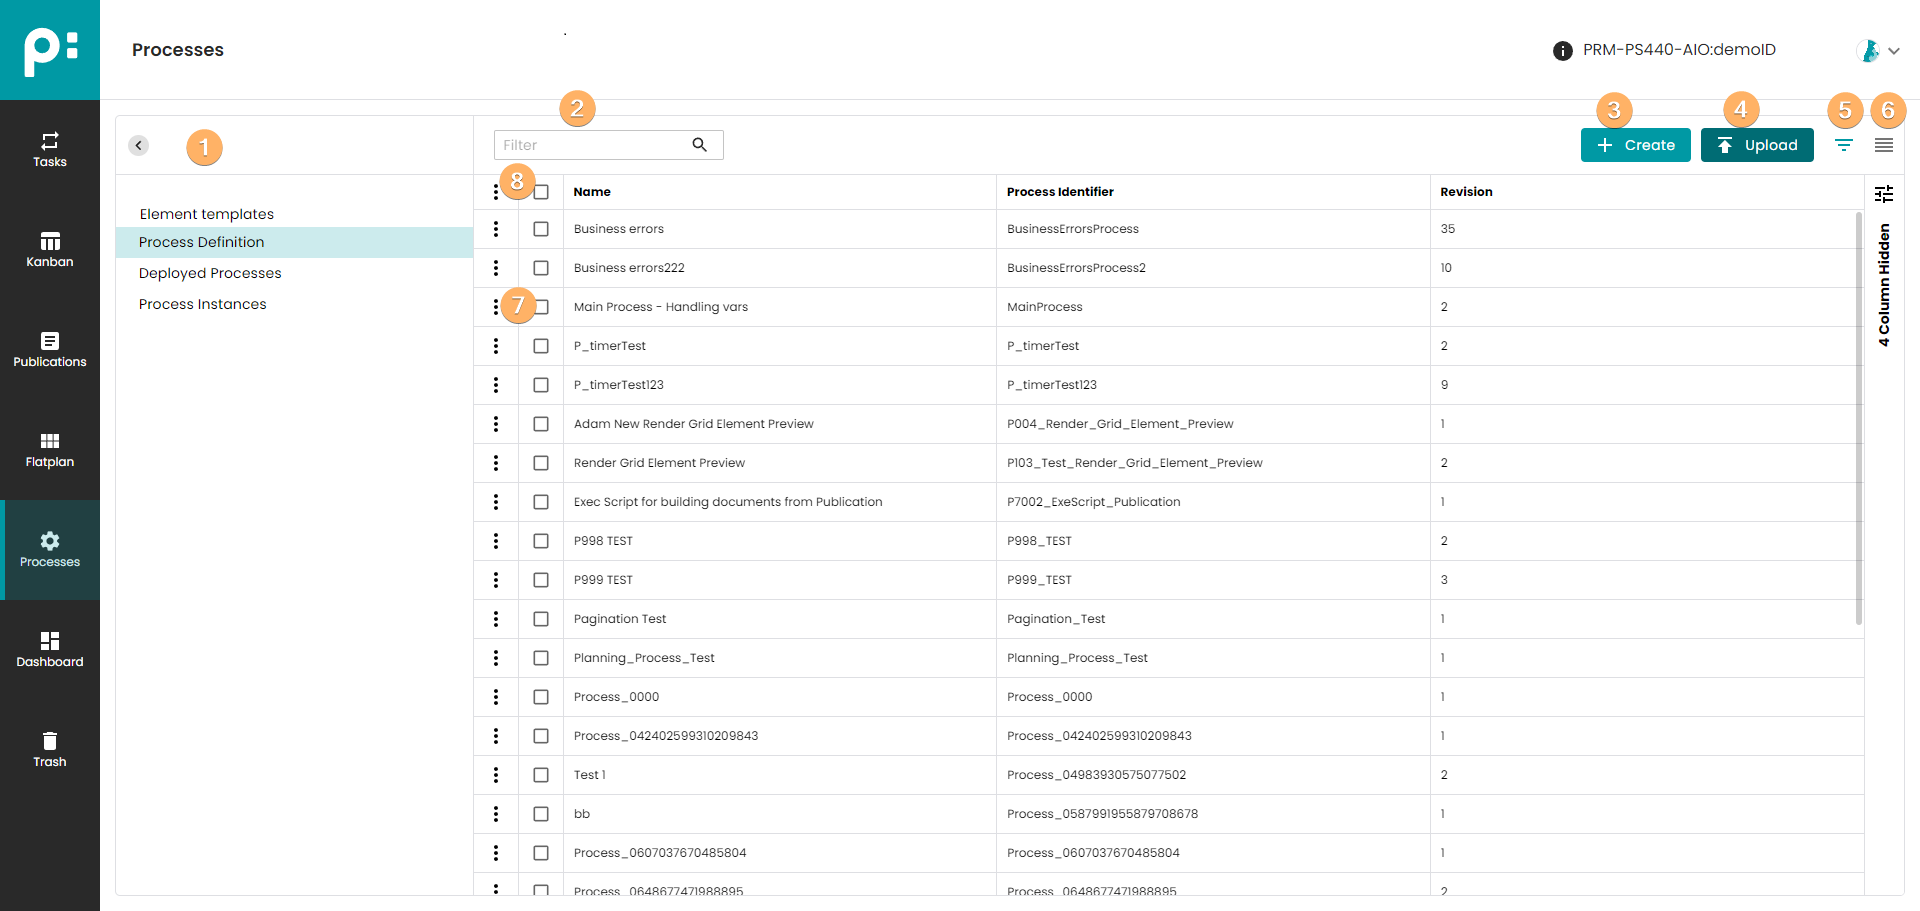
- The left pane shows the setting topics. Select a topic by clicking on it. The pane can be hidden by the angle button.
- This search will filter the existing process definitions.
- Create a new process by clicking the Create button. The process editor explained below will open with a start event only.
- Upload a process definition (a file of type BPMN) which was created externally. The process editor will open with the uploaded process. There you can further change the process, or just save it by clicking the Update button.
- The focus view mode will only show the latest revision of every process.
- The full view mode will show all revisions of the processes.
- The context menu provides the following commands:
- View: opens process editor in read-only mode
- Edit: open process editor
- Deploy: deploys the process to Camunda. This creates a new definition version of this process on Camunda. Only deployed processes can be started. See the explanation for the Deploy dialog below.
- Download: download a process as a file of type BPMN. The file can be edited via external tools (for example Camunda modeler) and/or uploaded to another pubserver.
- Delete All Revisions: removing all process definition revisions
- The multi-selection context menu allows for deleting all revisions of process definition in one step.
2.1 Process Editor
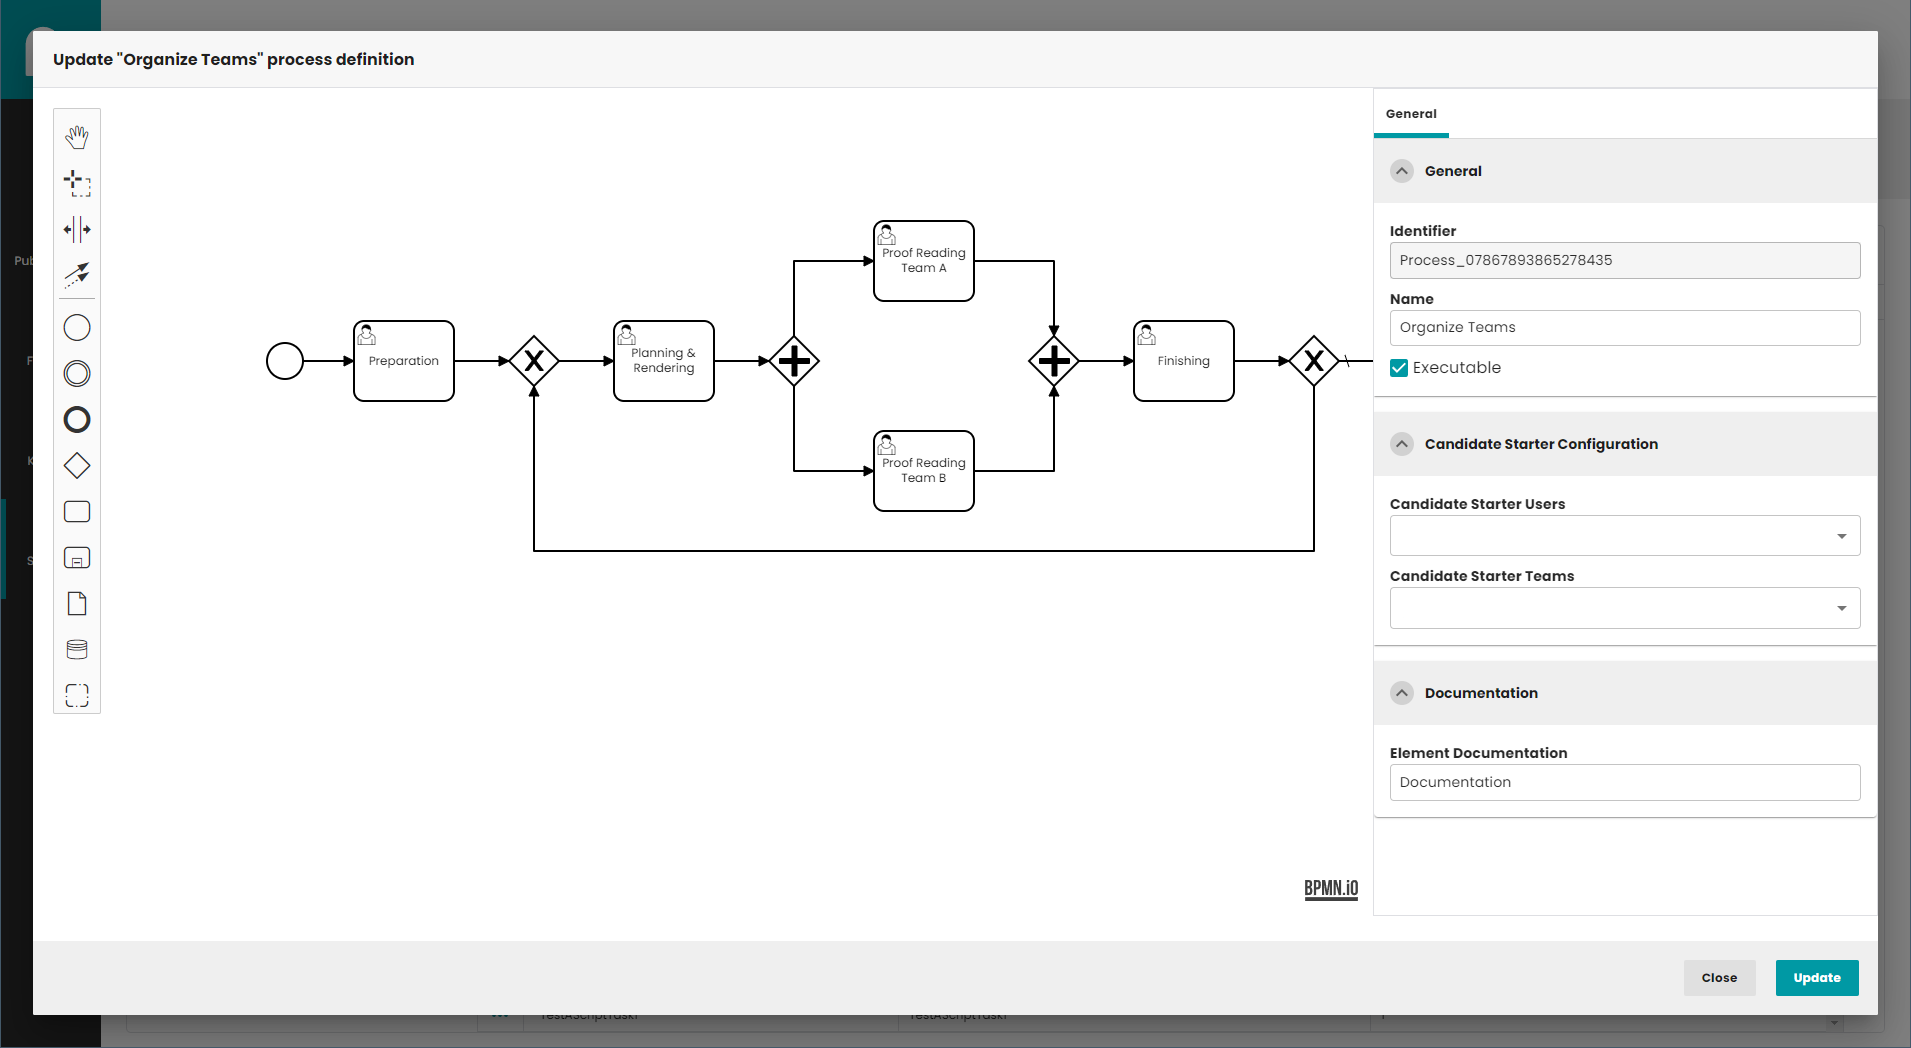
The process editor uses BPMN Viewer and Editor (https://bpmn.io/).
The following BPMN elements are supported:
- Start event
- End event
- Flow
- Service task
- User task
- Exclusive gateway
- Parallel gateway
- Error boundary event
- Timer event
- Subprocess
- Call activity
- Multi-instance parallel
- Multi-instance sequential
- Annotation
- Group
In the properties panel on the right side, view and edit attributes that apply to the selected element, or if no element is selected, to the process in general. More information about embedded modeler can be found here.
2.2 Deploy Dialog
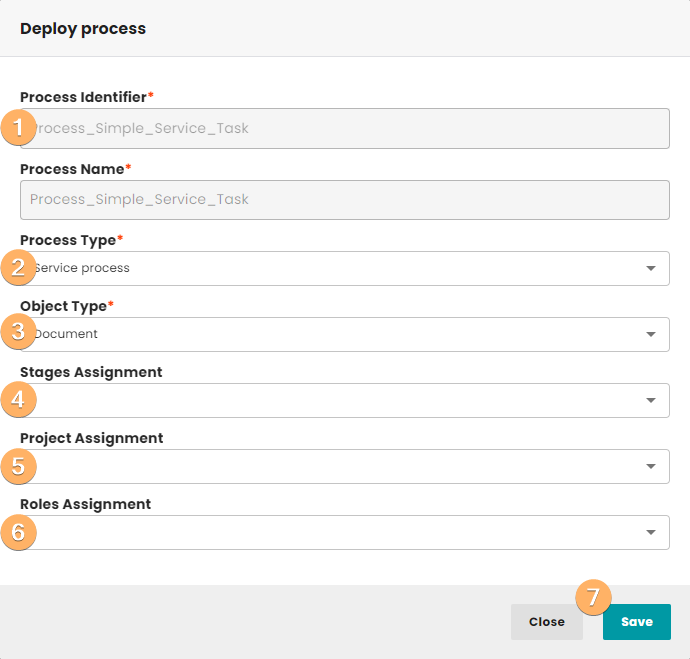
- Process identifier and name are defined in the process diagram. They cannot be changed here.
- The process type controls where the process can be started:
- User task processes and service processes are available in the “Start process” dialogs.
- Download processes are available in the Download dialogs, in context menu of window Publications and in Flatplan Delivery Stage.
- Upload processes are available in priint:admin.
- Grid element preview processes are used in Flatplan->Content Assignment stage -> print perspective. Only one process of that type can be used for a project. This process is running automatically when you go to print perspective or when you manually start rendering for a single Real grid element/Page/Document.
- Content processes to create content elements example (key values/prices...).
- Object type controls for which objects a process is available. Options are document, folder, publication, folder/publication, page, planning or real grid element. When process type is set to upload or download, then the list grown. The list additionally contains values: Role, User, Meta data and General.
- The drop-down Stages Assignment is shown when the object type document is selected. Here the user can control whether a process is available only in given stages. If no stages are selected, the process is available for documents in all stages. Multi-selection of stages is possible.
- The drop-down Project Assignment is needed if there are more than one comet projects in the pubserver. Then the user can control, for which projects the process should be used. If no project is selected, the process can be used in all projects. Multi-selection of projects is possible.
- The drop-down Roles Assignment controls, which users can start the process via the roles of the users. If no role is selected, all users can start the process. Multi-selection of roles is possible. Please note, that the candidate starter users and teams from the process diagram apply as well.
- Clicking Save finishes the deployment with the given metadata. Clicking Close cancels the action.
3 Deployed Processes
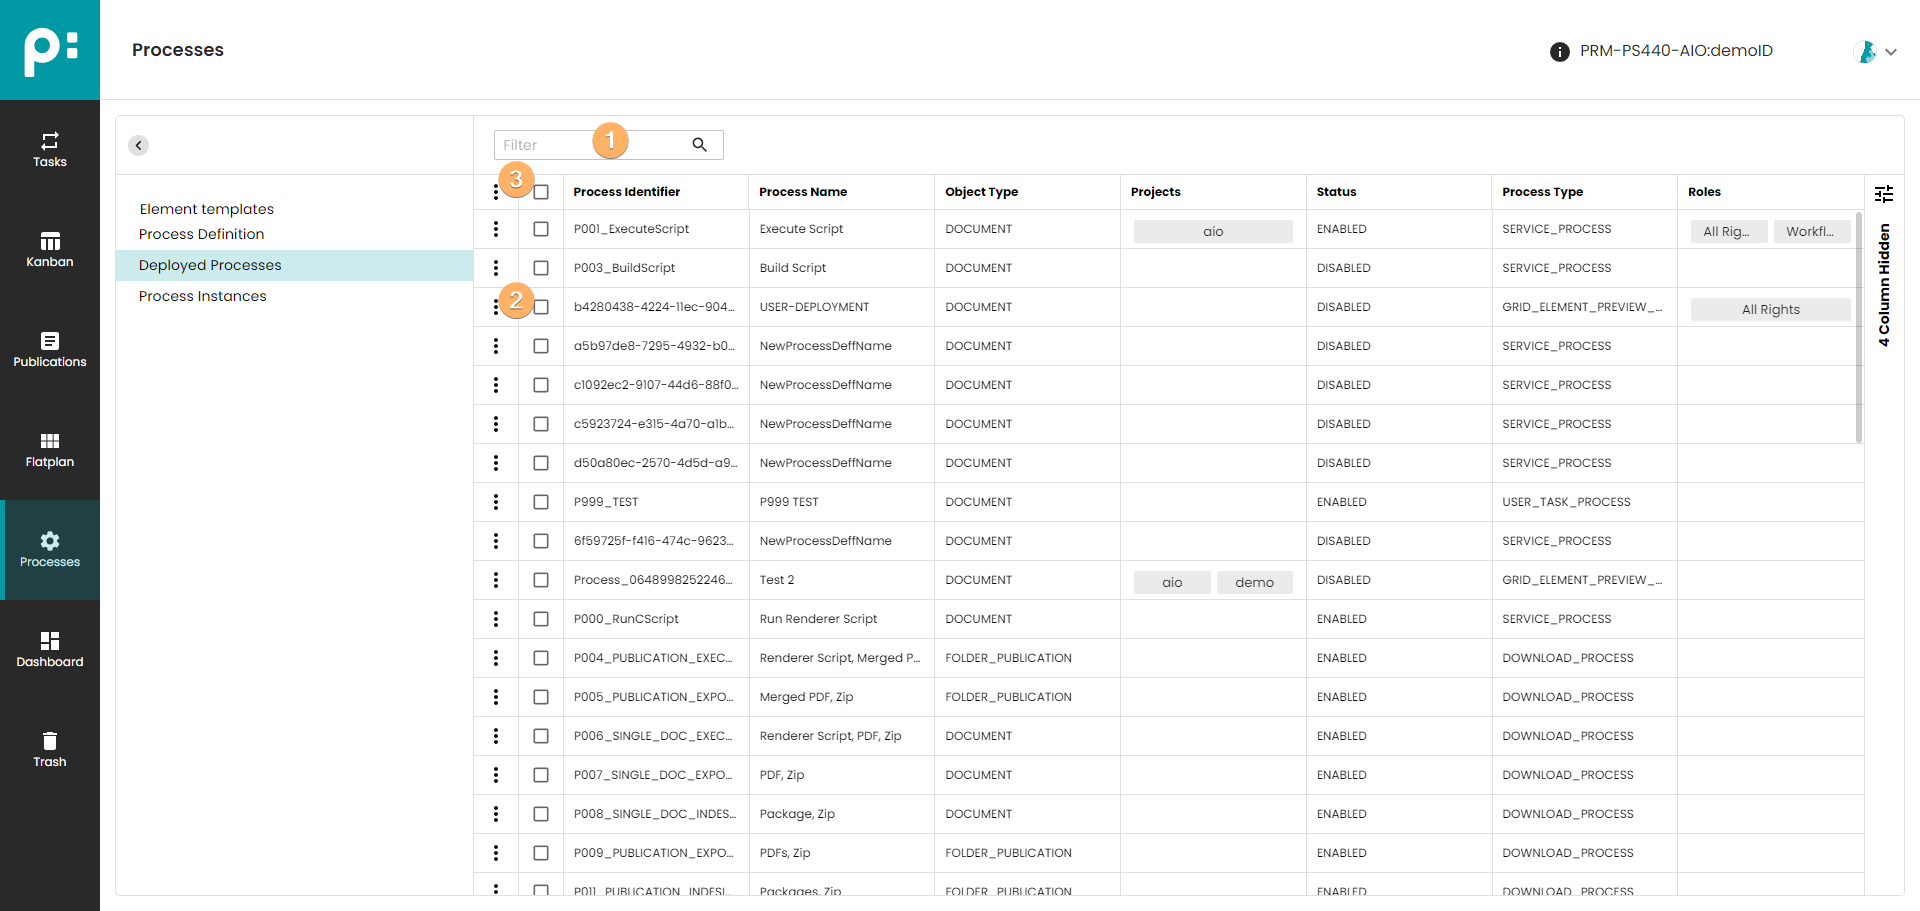
- The filter does a real-time filtering of the deployed processes.
- The context menu allows for editing the process metadata as given in the deploy dialog, deleting a process from Camunda server, and toggle between enabled and disabled. Users cannot start a disabled process anymore because the process is not shown in the process drop-downs anymore.
- The multi-selection context menu allows for deleting, enabling, and disabling some processes in one step.
For monitoring priint-bpm the web-application Camunda Cockpit is very useful. See https://docs.camunda.org/manual for its documentation.
4 Process Instances
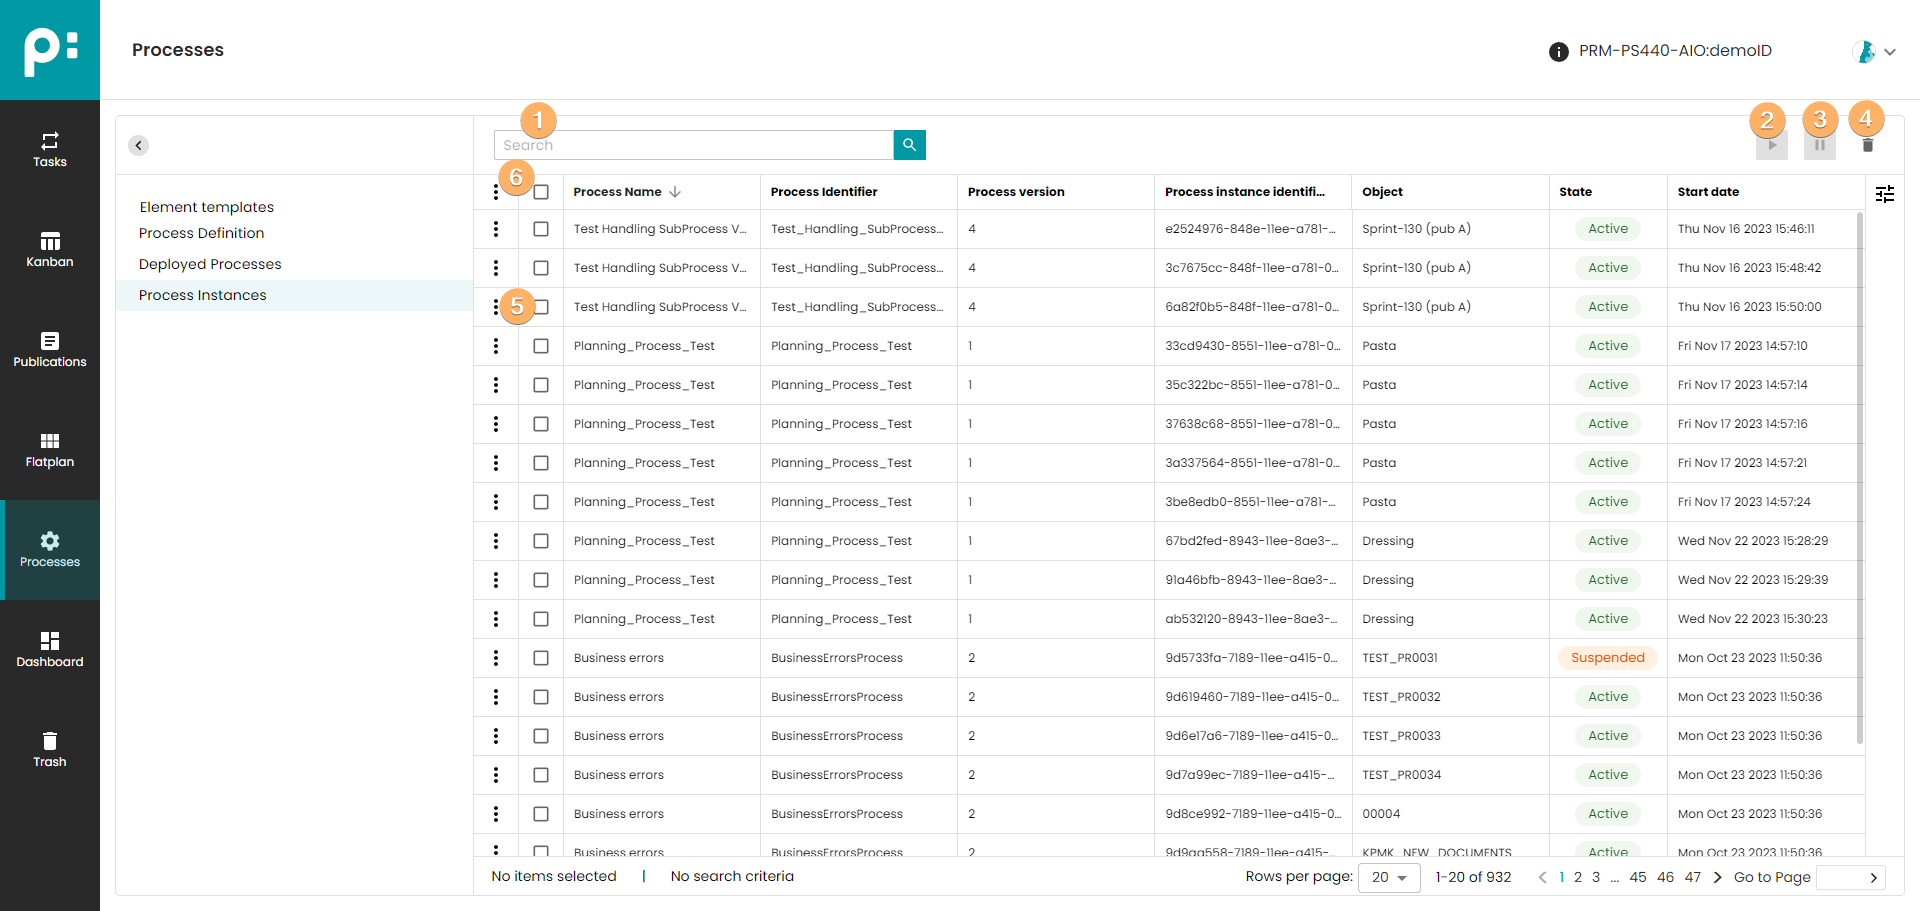
- Search field to narrow down the list of process instances.
- This button is used to suspend all selected process instances in the list.
- This button is used to resume all selected process instances in the list.
- This button is used to delete all selected process instances from the list.
- The context menu allows to suspend, resume or delete the process instance.
- The multi-selection context menu allows to suspend, resume or delete the process instance.
*The suspend, resume and delete operation is performed asynchronously, so there may be a delay in showing the results.